(Orginally published December 31st 2015)
While porting the GameMaker: Studio runner to the Raspberry Pi, I thought it would be very cool to allow access the GPIO (general purpose input/output) pins. This would let you use GameMaker to do some cool electrical experiments without A) having to resort to using Python (yuck) and B) allow remote development – meaning you don’t have to work on the actual Raspberry Pi itself – and possibly even remote debugging using the GameMaker debugger. All of which would be pretty cool.
I’ve already hooked up 2 different LCD screens, so I wanted to do something actually useful. Having a secondary SD card that isn’t controlled by the OS could be pretty useful – especially if you want to somehow make a console or something. You could boot up into Linux on the OS card, but then allow games to be plugged via this dedicated card – well that’s the theory.
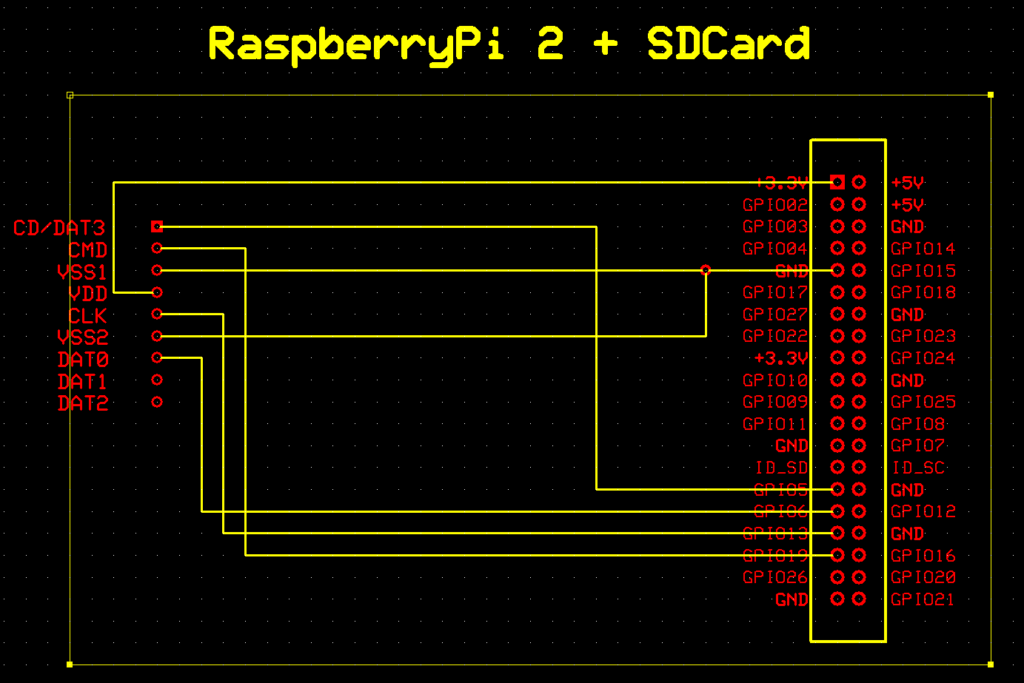
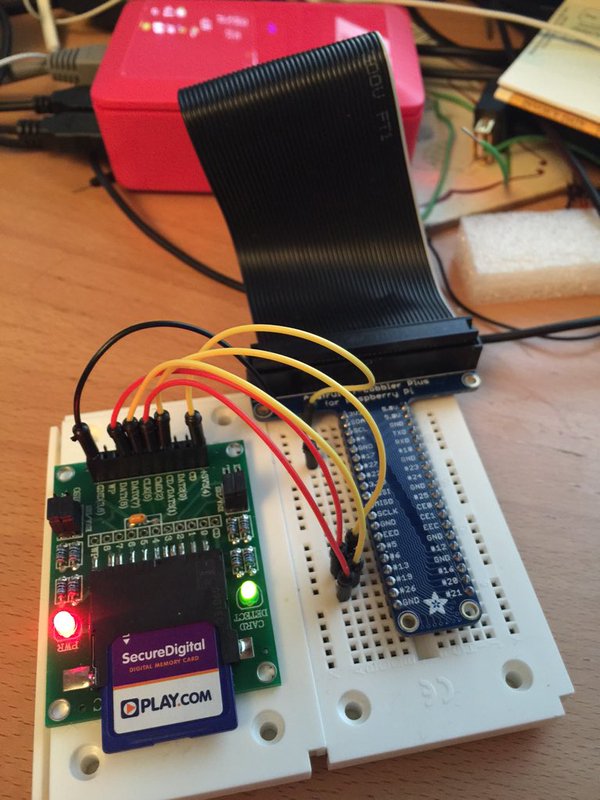
I’ve done SD card coms before with a Commodore 64, but it was some time ago, so I was almost starting fresh. Starting any new project is always annoying, you’re never sure if it’s a software bug, or an electrical one. It’s doubly tricky for a noob like me, as I’ve only just toyed with electronics, it’s mostly guess work. Still, that’s never stopped me before! I had a couple of false starts, but finally got the connections right, the final layout is shown here…
Because the Raspberry Pi‘s GPIO is 3.3v, I was able to just connect the pins directly, if they were different (5v for example) then I’d have had to alter the pins voltage before the hit the card. But you don’t need that with the Pi which makes life really simple – although I have been reminded that I should really use a capacitor to smooth things out, but this does work for just hacking around.
Once connected the real fun of trying to talk to the damn thing starts! SD cards have a very cool 1 bit SPI interface, where basically, you set bits and toggle a line up and down and the card accepts that bit. Send lots of these, it gets a byte – and so on. It also sends data in the same way, just toggle lines up and down and accept bits at your leisure!
So first, lets initialise the ports/data lines, and then we can get to throwing some data at it. Below is the code (written in GameMaker: Studio obviously) that sets up the ports and line direction. It’s worth mentioning that the Pi can set lines to input or output, so you can see below that I setup most to be output, and the DataIn line to be input.
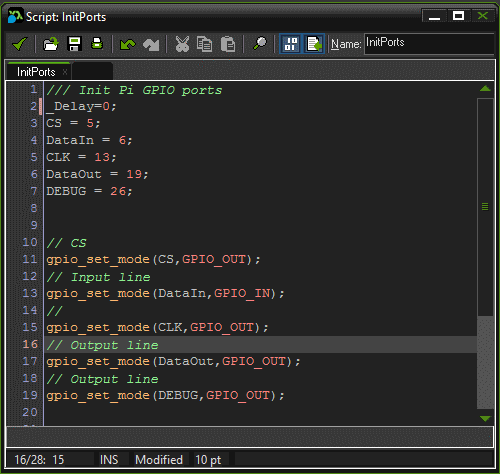
The CS is the chip select line. Whenever you want the card to accept your data, you set this line low (to 0).
The CLK line is the line we toggle Low/Hi to acknowledge that a bit has been sent or received.
DataIn/DataOut are the lines for the actual bit data we’re reading/writing.
All in all, it’s pretty simple. The Pi does have hardware SPI lines, but I’m not using these yet as I’ve yet to add support to GameMaker for them.
Once we’ve set these up, we really need to start trying to initialise the SD card – or MultiMediaCard interface as that’s what used it first. Before getting going, we really need a bit and byte sending routine. This is the lowest level of function we’ll use, and it’ll handle all the bit flipping we require.
The function to send a bit is very simple. We set the bit to 0 or 1, set the CLK line LOW(0) wait for a bit – this depends on the speed of your CPU, but on the PI,it’s a small (or non-existent) delay. We then read a bit in. We do this because it’s easier to have a single function that reads and writes, rather than having to worry about the state of the DataOut line while trying to use the DataIn line. This just makes life simpler. We then take the CLK line HIGH again (1), and pause again. After that…we’re done, just return the bit we received.
/// SendBit(bit)
SetDataOut(argument0);
SetCLK(0);
Delay(_Delay);
var b = gpio_get(DataIn);
SetCLK(1);
Delay(_Delay);
return b;
With this setup, we need to be able to send a command, and this the sequance you need(image from
http://elm-chan.org/docs/mmc/mmc_e.html )
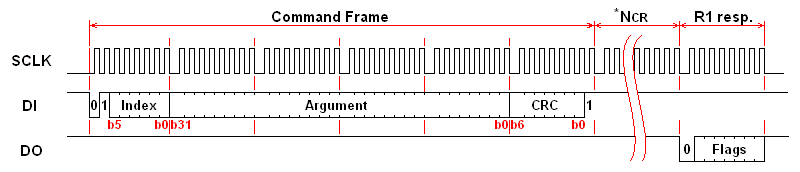
Command/Response sequence
You can see from the image above, we basically send bytes of Info to the card using the SendBit() function above for each BIT in the byte. The send command function is pretty simple once you know these two facts.
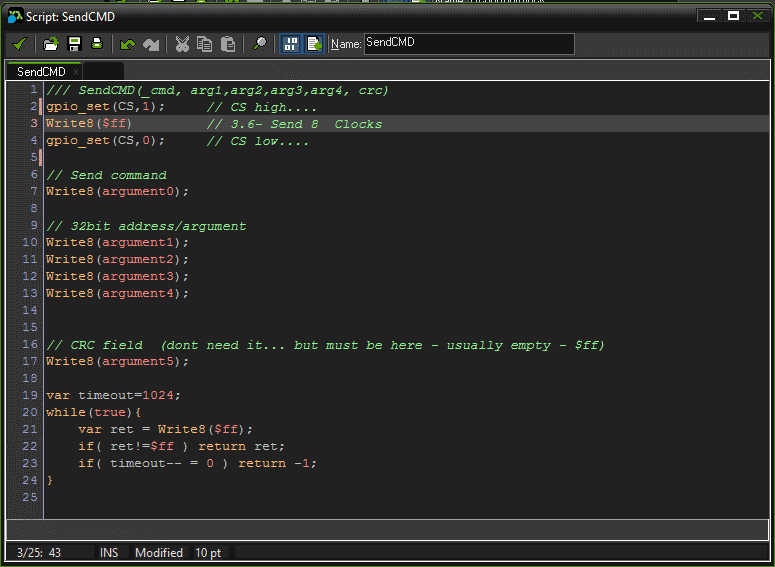
Once you have the Write8() function (which is just a loop of 8 around the SendBit() function) and the SendCMD() function, we really just need to actually use them to initialise the SD card. The core of the initialisation centres around sending the CMD0 and CMD1, but before doing this you have to pulse the SPI line a lot to set it into SPI more. This means sending “more than” 74 clock pulses while the CS and DI lines are HIGH. All commands should return a 0 if they are accepted, or an error code if not.
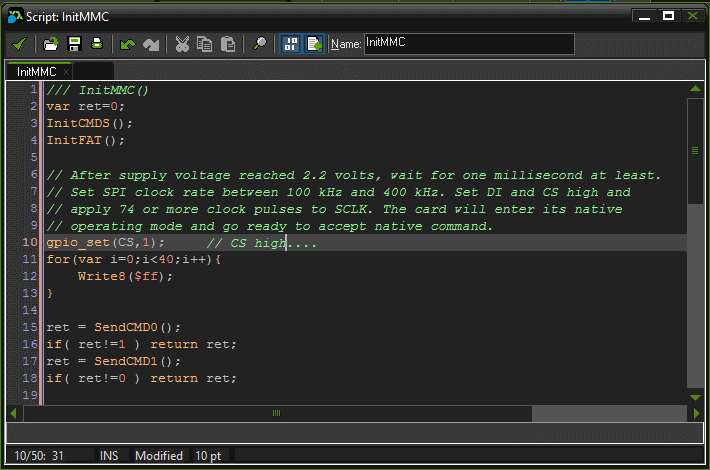
The InitCMDS() just sets up the command values, CMD0=$40, CMD1=$41 and so on, while InitFAT() is setting up stuff for reading the actual disk later…
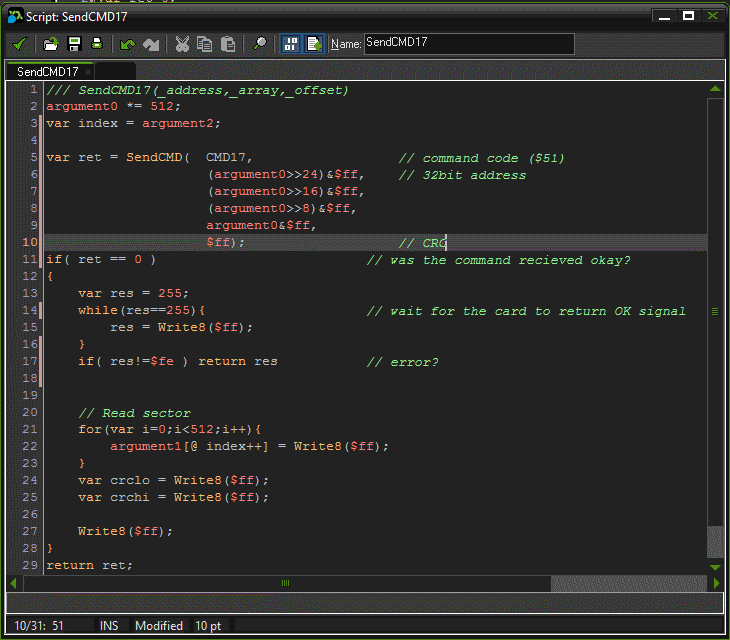
After we’ve done this, then the SD card is ready to actually send us sector data! CMD17 ($51) is the command that will return us sectors, it takes to form of <$51,32Bit_Address,$ff>. It’s worth knowing that after the CMD0 you don’t need to worry about the CRC for the most part. Just send $ff as the lat BIT needs to be 1 (see the SPI diagram above).
After sending the CMD17 command, we wait for the card to return $FE – basically sitting in a loop while it’s sending $FF. If we get a value back that isn’t $FF or $FE, then it’s an error code. Once we DO have $FE we can sit in a loop reading in 512 bytes of data, followed by 2 bytes of CRC (which we’ll ignore).
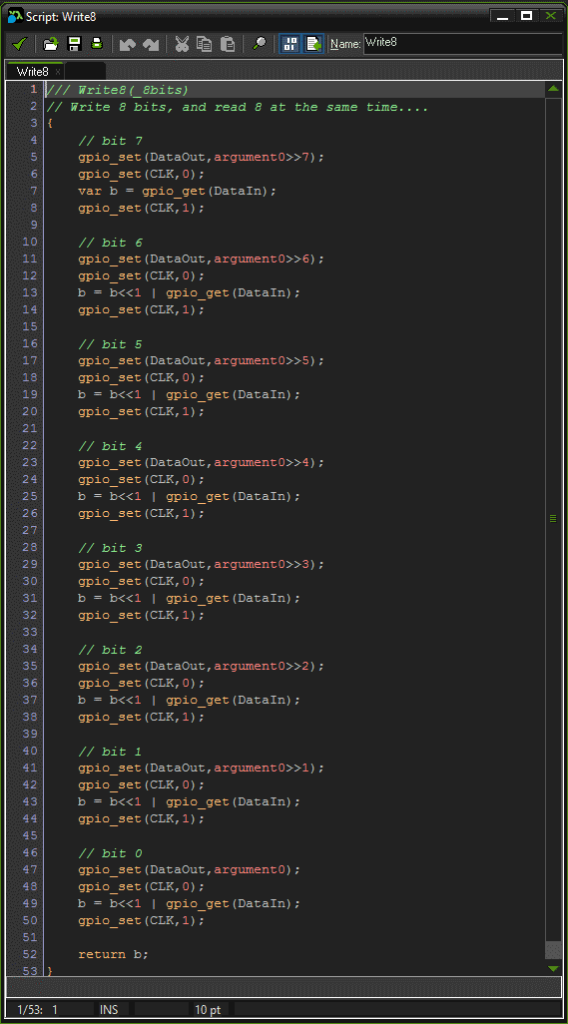
And that’s it! This should start getting you real information from the SD card. After this you can just Google FAT16 or FAT32 (which is easier I think), and start to decode the disk. For the sake of completeness I’ll include my (inlined and unrolled) byte b = Write8( _byte ) function….
As you can see, once you have the SD card connected to the Pi, there’s not actually that much involved in getting data out of it. This makes SD cards ideal for storage on electrical projects – after all, no one says you have to store data in a DOS format, you could just read/write whole sectors and store everything in a custom format. This is what we used to do in the old days, as “standard” formats are bloated for game purposes.
Some point soon, I hope we can release this GameMaker: Studio Raspberry Pi export, then you can have as much fun as I’ve had with this stuff. One thing I will say, is that remote development – i.e. not working on the actual machine, is brilliant for this kind of thing, because when you make a mistake and crash the PI (and I do – a lot!) I can reboot it without actually losing my source, or even having to load it all up again! Also, because I don’t have to boot into X for dev, it boots really quickly, making these mistakes pretty minor.
All in all, I’ve had great fun doing this and other little electrical projects. This so far include, my own micro switch Joystick, a 2 line character LCD screen, a 128×64 pixel screen and this SD Card reader. Not bad for a couple of weeks effort!
Here’s a list of pages I’ve found invaluable while doing this project – including some FAT16/32 resources.
SD card stuff
http://elm-chan.org/docs/mmc/mmc_e.html
Disk FAT16/FAT32
https://www.win.tue.nl/~aeb/linux/fs/fat/fat-1.html
https://www.pjrc.com/tech/8051/ide/fat32.html
http://www.maverick-os.dk/FileSystemFormats/FAT16_FileSystem.html
http://www.maverick-os.dk/FileSystemFormats/FAT32_FileSystem.html
http://www.tavi.co.uk/phobos/fat.html#boot_block
http://averstak.tripod.com/fatdox/dir.htm