So in this, the last part of my Commodore 64 Emulator series, I want to talk about some of the optimisations I did to help speed things up. But before getting into this, why do we need to speed things up? Wasn’t it all running at 100fps+ anyway? Does it matter if your already over 60fps, as this is the refresh of the monitor? Well, yes and no…. No once you’re over 60fps, its not that going to show any real difference. And yes… it does matter, because when things “hicup” the more spare capacity you have, the easier it is to absorb the hicup.
Lets say we’ve gotten everything to run at 60 – just, but running nice and smoothly. All of a sudden the game changes a lot of sprites/characters, and we drop 20fps. This means the overall frame rate has dipped to 40fps, and this means it stutters and slows down. But optimising and getting the FPS up to as high a level as we can, it’ll smooth out these blips, and run on lower end hardware than we’re using – there’s always someone with worse hardware then you.
So, with that behind us…what was slowing things down?
- Swapping surfaces
- Surface rendering
- Swapping shaders
- Instruction processing
- Several YYC issues
Okay, well we might talk about the YYC issues in another part one day – if I can ever persuade Russell to write about it, but the crux of it is that YYC code was being created in such a way that just slowed things down. We analysed and optimised the cases we found, and we got several good speed ups because of this. So, I’ll ignore this one for now, but let’s look at swapping surfaces first.
SWAPPING SURFACES
If you remember in Part 6, I talked about having 8 surfaces behind the screen, the screen itself, then another 8 surfaces in front. On top of this, I also have one surface for a bitmap screen, and one for the character map cache, and another for the sprite cache. 20 in total. This in itself isn’t terrible, but the real problem comes when we have to swap back and forth all the time to draw anything!!
Let’s take the best case – everything is generate and cached, and we just have to render pre-generated sprites and characters. This requires swapping back and forth from the character surface, to the sprite one, and swapping from the sprite cache to the character cache – every time. This isn’t great, in fact it sucks – especially as it also involves a shader swap. So first thing we need to do, is reduce the cache swapping. Fortunately, this is actually pretty simple. Since we render into the cache at different offsets depending on the sprite or character, we can simply make the surface large enough to accommodate both caches, and set the origin of one of them a bit lower down. We then just offset the rendering of the sprites by this new origin. This means ALL our cached data now comes from the same source, and this in turn means we never “break the batch” when rendering quads from it.
Breaking rendering batches is bad, but every time we swap texture, blend mode, primitive type or vertex buffer, we have to flush all our primitives out to the graphics card and start again. This is exactly what happens when drawing characters and sprites. Every time a sprite came along, we’d have to flush the characters we’d built up, and start again. Now however, because they both come from the same surface, we can build up a whole frame (if everything is still cached), and output in one large primitive draw command.
Next… how about all these surfaces we draw to. Well the same thing applies. As we change surface, all the batches are broken, and we lose valuable speed. Let’s say we’ve a normal game, complete with multi-plexed sprites. What currently happens, is we render a line to the application screen, then swap to the character screen, render to that, then back to the application surface as we “pop” the character one off, then select the sprite 0 surface, draw to that, then perhaps sprite 3 and draw to that, then back to the application surface, then the character one and so on…
Massive amounts of changing of surfaces, meaning that hardly anything gets batched anyway! So our first task… to try and get all of these onto the same surface. Just like the sprites and character caches, we can simply offset each screen so that sprites render into the top half of the surface, while bitmaps and characters render into the lower half. I selected to use a 2048×2048 surface, which is large enough for all my needs, but small enough that every device will be able to create it. This gives me a map looking like this….
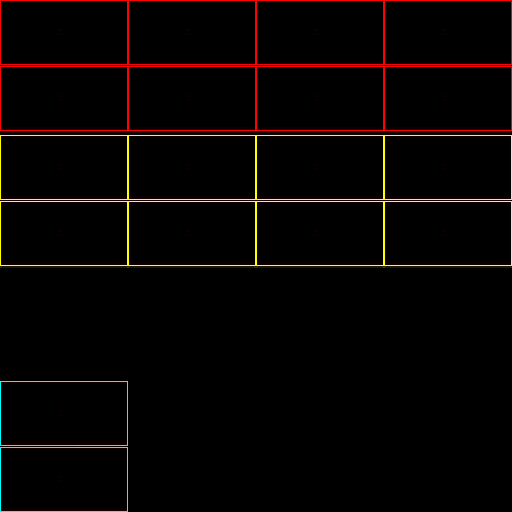
Those in red are the background sprite screens, those in yellow the foreground ones. The lower 2 areas are the sprites and the bitmap screens. This now means we no longer have to swap back and forth for any of our screen…or rather for most of them. We still have the problem of the background colours. These are currently drawn as lines directly to the screen. Still, not a problem, we can just allocate another screen on this large page, and draw lines there. But wait! We can save some space and pixels here. The background colour is always a single colour covering the whole line, so why bother drawing the whole line – why not just plot a point instead, building up a 1×200 image, then stretch that thin coloured line over the whole screen later? This works great,, and now means ALL our drawing is to this screen.
So, at the start of our emulation tick, we set this surface, and then at the end – we release it. The only time it now changes is when we have to update a slot in the character or sprite cache, which we hope isn’t too often anyway. This change alone yields over 100fps speed up, so well worth doing, not to mention it’s a great debug tool, as we can now see everything at a glance.
SURFACE RENDERING
This is actually an Engine level this, and it’s for reasons like this that I do these slightly off the wall projects. Because we now have a large-ish project to use as a test, we can now profile it in the C/C++ code, to see where we have some issues. One of them turned out to be the surface drawing code. You’ll remember that we use a draw_surface_part_ext() command, and it turns out this command was using a TriStrip to render. Triangle strips are one of the worse primitives you can use, as it ALWAYS breaks the batch. So we were only ever rendering a QUAD (2 triangles) each time we submitted a sprite or character to be drawn. So we changed this to use a triangle list (the same as we use for sprites), and this now means they can all be grouped together into much larger batches. Doing this almost doubled our frame rate! And it’s an improvement that our entire community will benefit from – which is very cool.
SWAPPING SHADERS
So, rendering hires, MCM or Sprite MCM all had their own shaders (or not – in the case of hires stuff), but it turns out swapping these is another batch breaker. This is obviously because as you swap shader, it needs to flush out all the vertices that’s using that shader before swapping, and setting as shader is one of the most expensive state changes you can do, so you really don’t want to have to do it if you can possibly help it.
After a little thought, I realised what I actually wanted was a shader that rendered one of 4 colours per pixel – depending on the value, rather than what I had now which had real ARGB values for hires, and a pixel choice system for Sprite MCM and a different one for Bitmap MCM (this is because colour choice differs with sprites and characters).
I also really wanted to get rid of the constants I was setting for the MCM colours, as this is yet another batch breaking change. Currently in the code, I get the 2 C64 MCM colours, look them up in the palette array, then set 2 vec4s with them. But these change all the time, so I end up setting these a lot – especially in characters as this is something C64 coders changed per raster sometimes. But how do I get 2x2bit colours into the shader without using constants?
The answer was to not use ARGB colours, but keep them as C64 colours, and then decode them inside the shader! Because a C64 colour is only 0 to 15, I could easily use the red channel as the hires/attribute colour, the blue channel as the MCM1 colour, and the green channel as the MCM2 colour.
If you think back to when I create my sprite cache, I render in wither $FFFFFF or $C0C0C0/$808080/$404040 for hires or MCM. So now, I just change this to always render 96,128,160, and so now in both hires+MCM I pass in the C64 colour like this….
col = (mcm2<<16) | (mcm1<<8) | rawcol;
draw_surface_part_ext( CharacterCacheSurface, left,top, 8,8,  xx+Xoffset, yy+Yoffset,1,1,col,1 );
where each of rawcol, mcm1 and mcm2 are all values of 0 to 15. Then in the shader, I detect the pixel in the surface, and then using the vertex colour I lookup the real C64 ARGB colour! This sounds way more complicated than it is…. I in essence draw into the character and sprite screens using C64 colours (0 to 15) instead of full ARGB colours. Then when I combine all the pixels at the end, I use a shader to convert these values to real ARGB ones for displaying.
What this now means, is that I can have a single shader no matter what I’m rendering, and I no longer need to set constants as I go, I can pass everything I need in via the vertex colour. All this is again, a big speed up.
I’ll also mention a final bit of this process which I’ve still to do – combining all these sub-targets, into a final display. Currently I still draw 20 surface parts, but actually, now they are all on one surface/texture, I could do this in a single shader. An added benefit of this, is that I could do sprites behind the background properly, as I could read a sprite pixel then read the bitmap/character map screen, and if its MCM2 or the background colour, I could draw the sprite pixel instead of the back ground pixel. This would solve the last real visible rendering issue I have. I’ll get around to this at some point…..
I’ll leave the shader section by showing you the “combine surfaces” shader…. This is the one that converts C64 colours, into real ARGB ones
//
// Simple passthrough fragment shader
//
varying vec2 v_vTexcoord;
varying vec4 v_vColour;

//
// Convert a C64 colour (0-$F) into a proper RGBA colour
//
vec4 GetColour(float _colour)
{
    //  C64 palette   R   G   B   A
     if( _colour<=8.0) return vec4(0,0,0,1.0);
     else if( _colour<=(16.0*1.0)+8.0) return vec4(1,1,1,1.0);
     else if( _colour<=(16.0*2.0)+8.0) return vec4(0.41,0.22,0.17,1.0);
     else if( _colour<=(16.0*3.0)+8.0) return vec4(0.44,0.64,0.70,1.0);
     else if( _colour<=(16.0*4.0)+8.0) return vec4(0.44,0.24,0.53,1.0);
     else if( _colour<=(16.0*5.0)+8.0) return vec4(0.35,0.55,0.26,1.0);
     else if( _colour<=(16.0*6.0)+8.0) return vec4(0.21,0.16,0.47,1.0);
     else if( _colour<=(16.0*7.0)+8.0) return vec4(0.72,0.78,0.44,1.0);
     else if( _colour<=(16.0*8.0)+8.0) return vec4(0.44,0.31,0.15,1.0);
     else if( _colour<=(16.0*9.0)+8.0) return vec4(0.26,0.22,0,1.0);
     else if( _colour<=(16.0*10.0)+8.0) return vec4(0.60,0.40,0.35,1.0);
     else if( _colour<=(16.0*11.0)+8.0) return vec4(0.27,0.27,0.27,1.0);
     else if( _colour<=(16.0*12.0)+8.0) return vec4(0.42,0.42,0.42,1.0);
     else if( _colour<=(16.0*13.0)+8.0) return vec4(0.60,0.82,0.52,1.0);
     else if( _colour<=(16.0*14.0)+8.0) return vec4(0.42,0.37,0.71,1.0);
     else return vec4(0.58,0.58,0.58,1.0);
}


void main()
{
     vec4 col = texture2D( gm_BaseTexture, v_vTexcoord );
     if( col.a==0.0 ) discard;

     gl_FragColor = GetColour( col.r*255.0 );
}
Easy peasy. You’ll notice I multiply the value by 16, this is so when I look at the surface in a paint program, it’s not all really dark colours, but something that’s easily visible. But it’s still basically a 0 to 15 colour – just scaled up a bit. Also the reason for using IFs and not a table look up, is because HTML5 can’t use a variable to index an array, just a constant (or loop index – which is expanded and becomes a constant). but shaders are fast, so what the hell.
INSTRUCTION PROCESSING
Lastly the actual emulation of the CPU. Now, I had optimised a part of this at the very start, changing it to a jump table, and then changing it into a huge switch statement. The next part was to use the GMDebug profiler to actually see what the common instructions are, and “inline” them. Even having a big switch statement, it still calls a small function when it gets there – mainly to keep the code simpler, but when push comes to shove, we need the speed more.
So after profiling a few games, it turns several commands are the ones that get used the most – some of them are BNE, BEQ, LDA #$??, LDX #$??, LDY #$??, CLI, INC $??, CMP #$??, LDA ($??),Yand so on…
Some are hardly ever called, so can be pretty much as slow as you like – as long as they work. But after inlining these into the switch statement, I got a small – but noticeable speed bump again. In time critical code – that is, code which runs thousands of times a frame, calls are expensive so removing the call speeds things up a lot. With this in mind, I also inlined the opcode GETABYTE() function. It calls it at least once for every instruction, and it’s only a few instructions long, so in it goes.
I also tuned the interrupt and raster emulation, trying to remove as many IFs as possible from the code emulation loop – for exactly the same reason as above. Ultimately, the less code you execute, the faster it’s going to go – not exactly rocket science is it?
FINAL THOUGHTS….
So there you go, I never expected to get anywhere close to this level of emulation, and I’ve learnt a lot about how to go about things inside GameMaker: Studio, and how I can cheat widely in some cases. I’ve also thoroughly enjoyed every second of it, while at the same time – pushed some of GameMaker’s features further than most thought possible, myself included at times. I’ve also really enjoyed using some of the newer features, like the dynamic audio, and helped find several bugs, and more than several optimisation targets that everyone can benefit from.
I’m still unsure as to what form this will appear on the Marketplace, but I’ve already started a “sid player” that lets you play old C64 music in your games, but I also like the idea of just giving you a mega SID chip (without C64 emulation), with lots of channels so you can do “retro” sounds in your game. Also, releasing a 6502 core for folk would mean that they could play with emulation themselves – like old consoles, while I know some are interested in the full C64 package. So I’ve still stuff to figure out.
I have one more “emulation” post to make, but it’s based on my GameMaker: Studio ZX Spectrum shader, as it’s very cool and yet another way of doing things and cheating the system.
Hope you’ve all enjoyed these posts, and we’ll try to get more development blogs in the future.