So in this chapter, I thought I’d tackle the tricky subject of SID chip emulation, both how I generate the sounds, and how I get them to play back in GameMaker. Before getting into any of the nitty gritty, let’s have a quick look at the SID chip itself. Back in the day, it was the sound chip, the sound it generated was unparalleled in computers, and the musicians that created music on them – Gods among developers, superstars in their day. So what can this masterpiece of engineering do?
It’s a 3 channel engine chip of playing Sawtooth, Triangle and Pulse waveforms along with a white noise effect, all controlled through hardware based ADSR (Attack, Decay, Sustain and Release) volume control system. It could also do some amazing effects via ring modulation and high, band and low pass filters. My somewhat simple emulation doesn’t currently deal with ring modulation, or the band filters, but you still get some amazing sounds from the basics.
First, lets discuss the ADSR interface. What this does is control the channel volume over time. Each part of the ADSR sequence can have one of 15 values – with the exception of the sustain section, which is a 0-15 volume level. When a sound is started, the Attack phase with slowly raise the volume until it reaches the target value, then the decay phase will let the volume fall until it reaches the sustain volume level. The sustain level will then hold indefinitely until the sound is switched off, at which point it triggers the release phase.

Each phase of the ADSR has its own timing setup, and dictates how fast the volume will reach its target. Here is the attack phase….
2ms, 8ms, 16ms, 24ms, 38ms, 56ms, 68ms, 80ms, 100ms, 250ms, 500ms, 800ms, 1sec. 3sec, 5 sec, 8sec
So when we start playing a sound, we start the channel’s volume at 0, and then depending on the attack setting, we slowly increase the volume so that by the time the selected time has elapsed, we’ve reached the peak amplitude. We then enter the decay phase. This is usually a smaller phase and the volume decreases until it hits the sustain level.
6ms, 24ms, 48ms, 72ms, 114ms, 168ms, 204ms, 240ms, 300ms, 750ms, 1.5sec, 2.4sec, 3sec, 9sec, 15sec, 24sec
Once we’re at the sustain level, the SID chip will output the selected waveform continually at the selected volume level, until the sound is switched off, at which point it enters the release phase – this means the sound doesn’t switch off right away, but always goes through the release cycle.
6ms, 24ms, 48ms, 72ms, 114ms, 168ms, 204ms, 240ms, 300ms, 750ms, 1.5sec, 2.4sec, 3sec, 9sec, 15sec, 24sec
If a near instant release is required, then you can simply select a fast release rate, and a frame later reuse the channel. So to recap… the ADSR system simply controls the volume level of the sound – from 0 to 15, although for calculating nice delta steps, you’ll need higher precision in there. Let’s examine this a little closer, and take the attack rate. We’ll select a 250ms attack rate, which means we need to go from volume level 0 to 15 in 250ms. If we were processing the sound only once a frame (at 50hz – or 50fps, where 1 second is 1000ms), we’d need to know how many frames we’re processing over. So a single frame at 50Hz, is 20ms (or 1000ms/50fps = 20). Therefore 250ms/20ms=12.5 frames, meaning we have to take 12.5 frames to change our volume from 0 to 15. This is simply 15.0/12.5 = 1.2 per frame.

Knowing this, we can simply set the volume to 0.0, then each frame we add 1.2 to the volume. Once 12.5 frames have passed (and the volume has reached 15.0), you’d enter the decay phase, where you start at the current volume level of 15, then you’d need to work out the delta step required to go downwards from a 15.0 to the desired sustain volume level, where you’d then keep processing at the requested volume, until the sound is switched off. At that point, you do all this again, dropping the volume from the current sustain level right back down to 0 using the release delay rate timings.
All of this is dealt with via a simple state machine, moving from one state to the next as each phase expires.
So – that’s the volume dealt with. What about the actual wave form? We have 4 wave forms to deal with, and we can either procedurally generate them – they’re pretty straight forward – or we can play a sample. I’ve elected to play a sample. This is because i find the samples (which I recorded from an actual SID chip years ago) gives a slightly nicer sound. I sampled the sounds at Middle C, then when playing back at the desired frequency ( the note the game wants to play), I dynamically resample it – stretching it (thereby slowing it down and making it a deeper sound), or compressing it (thereby speeding it up – and making it higher pitch).
This is surprisingly simple, but relies on something we’ve not talked about yet – sample rates. Now, you may recognise sample rates such as 44100Hz from CD playback, but we’re going to pick a slightly different rate – 31200Hz. What does this number mean? Well, this is the number of values the sound hardware will play back per second. In our case that’s 31200/50fps = 624 per frame, or 2 samples per scanline. This is a nice number, and gives a pretty small sample to have to generate each frame. So, while re-sampling for our desired musical note, we also have to consider the destination sample rate so that it does in fact play back at the correct speed. Shown below is the calculation you use to resample and work out a “step” value. It’s pretty simple, you just plug in the values you need and get a new one out.
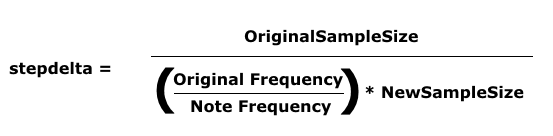
There’s a lot of numbers flying at you here, divide by this… multiply by that, scale by this. This can’t be helped I’m afraid, it’s just the maths involved in it. However…. once all this is worked out, you end up with a delta value, that is a value that you can add to the current index to step properly through the sample, and save it to our output buffer.
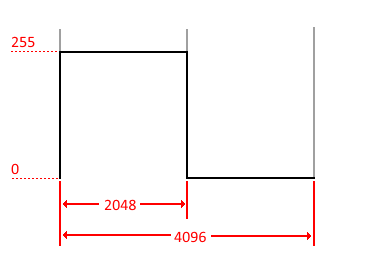
The last part of all this, is Pulse wave generation. I elected to create these as it gives a better quality sound, than just re-sampling. A pulse wave is very simple, Maximum volume for a time, then Minimum volume for the rest of the time. This is then repeated very quickly and gives a “buzzing” sound. By changing the width of the pulse from square (equal high and low) to more on one side than the other. There are 4096 possible waves here, with 2048 producing the middle point – square wave. So building one of these is simply a matter of working out the scale from one side to the other, where this magic 2048 will have a 50/50 setting. For example… if you had a value of 1024, you’d end up with 1/4 high, and 3/4s low, while 3072 would have 3/4 high, and 1/4 low.
So the very last part of the puzzle, is how we fill our output buffer – I sort of skimmed over this above, but lets tackle it now. Using the playback speed of 31200Hz, I said this is 624 ticks per game frame. So knowing this, I need to fill the buffer 624 times per frame, so I need to get the number of cycles per scanline, and divide it by 2, at which point we can add a sample at the start, and when the C64 executes half a scanlines worth of cycles – about 31 if everything is normal. Whenever this cycle counter counts down, I call the ProcessSID( ) function which processes the ADSR rate, and scales the sample, finally getting the value for each channel we’re going to write. At the end of each emulated frame, we’ll have 3 buffers of 624 bytes filled, at which point we can mix them into a single 16bit buffer, which then gets queued up to be played back.
Speaking of playback…… Now we have our buffer – how to we get GameMaker to play it? We use audio buffers. These are special buffers that we can queue up for GameMaker to play, and while they can be any size, we’ll keep them to a single frame as that simplifies audio generation. We then get an asynchronous audio event each time a buffer finishes playing, allowing us to fill it again, and re-queue it. So this seems to be pretty simple. First we create an audio queue using audio_create_play_queue(), then we create “N” buffers using buffer_create(), and finally we queue them all up using audio_queue_sound(). Once playing, we get a callback for each buffer as it finishes via an event with the buffer handle, at which point we can re-queue it, meaning we have an infinite cycle of dynamic buffers playing back.
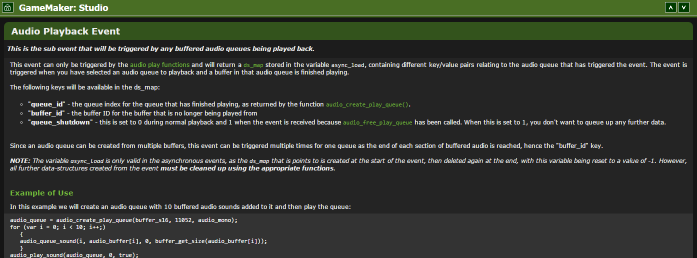
You can read more about it in the docs HERE.
So that’s the basic idea of dynamic audio playback in GameMaker, but it’s not quite that simple for us. Setting up a sample rate of 31200Hz and single frame buffers, means the audio playback will finish playing a buffer at exactly 50fps – it’s very precise. The issue is that when we setup a room speed of 50fps, the game tick, isn’t nearly as precise. this mean that for each gamemaker tick, chances are the audio buffer has already finished, and started another one. Without perfect synchronization, you will at some point, get drift, and drift is a killer. It means playback will slowly catch up on our emulated audio buffer generation, and then overtake it – thereby playing old buffers again, causing stuttering, and what sounds like stalling playback. In fact the only way to get perfect emulated playback is to use the audio callback to actually do the timing, but we can’t do that in GameMaker, so how can we stop the drift.
The slightly odd approach I picked, works fine on desktop – but won’t on mobile, or HTML5. What I did was ramp the room speed up to 1000fps, then I disable all clearing in the room, and inside the draw event, if there hasn’t yet been an audio event, I do nothing and exit as quickly as I can. When an Audio event does happen, I increment a counter and this is picked up in the draw event, at which point I can emulate the next “N” frames. You’ll notice I say “N” and not next. This is because of the drift, I will occasionally get 2 audio events being requested, and I’ll need to process 2 frames. This works pretty well on desktop, but I have yet to solve playback on systems that tie the framerate to 50 or 60hz.
My current plan to solve this is to detach the SID processing and move it into the audio callback, treating it like a totally separate entity – which in reality, it is. It is after all a stand-alone chip that runs just like any co-processor. So by moving the SID processing into a separate thread (or event in this case), I can process it as though it’s running independently, and all it has to do is read the current state of the hardware and work off of that. As things slip and you have to suddenly render 2 frames, there may well be some odd “glitches” in the sound, I’m not sure, but short of running the whole emulation in the audio event (which is how the C/C++ one effectively works), there’s no perfect way to sync things together fully.
Well, that’s the plan…… It may fall flat on it’s face when I get around to trying it. For Desktop, the current solution works pretty well.
A quick word on the number of buffers to create… while it might seem tempting to create lots so you have plenty of space, actually you want as few as you can get away with. The more buffers you have, the more lag in the playback there is. If I generate a buffer of sound for a frame – a frame that might be an explosion of a baddie, and it’s not played very soon, then the explosion will happen, and “sometime later” you’ll hear the sound. So it’s important to try and keep the number of buffers to a minimum, 8 appears to be the most you can get away with, while 2 is the perfect case – and 3 the minimum you’ll manage with GameMaker under even the best conditions. I’ve managed to get it all working with 4, but 8 feels okay.
So there you go…. I hope at least some of this makes sense. In the next post, I’m going to talk about surface optimisation, and the sudden inspiration I had for simplifying my shader.