So, now that we have C64 sprites being rendered, how about characters? Well like sprites they are made from blocks of memory on even boundaries, all be it a lot smaller. So we can do the same trick with invalidating and caching on demand 8×8 surfaces. So how many 8x8s can a C64 hold? Well…8,192. That’s a fair old step up from the 1024 that Sprites used. So can we fit 8,192 characters on a surface? well, as it turns out they fit nicely on 1024×512 surface, which isn’t too large at all these days.
So, just like sprites, when the CPU “pokes” into memory, we take the address, divide it by 8 (a single C64 character takes 8 bytes), then flag that block as invalid. Once this is done, we can use the screen drawing loop we created before, and for each character we read from screen memory, work out it’s actual address, divide it by 8, and check to see if we need to refresh it. To work out a characters actual address, we take the base address of the currently selected VIC bank; it can be one of 4 addresses – $0000, $4000,$8000 or $C000, and add on the base on the character set within that bank. Character sets can in one of 8 locations in each 16K block: $0000,$0800,$1000,$1800…up to ….$3000,$3800. Once we have the character set address, we simply get the character code (0 to 255), multiply it by 8, and add that on as well to get the actual character bitmap address, then divide the resulting number by 8 to get our character “slot”, at which point we can check to see if it’s memory has been written to, and if so we rebuilt the character.
Once we decide this, we work out where in our 128×64 grid of characters (our 1024×512 pixel character cache) the refresh character goes. We set the character map surface, disable alpha blending, then draw a black rectangle with 0 alpha – this clears the square if we’d done this…
draw_clear_alpha(c_black,0.0)….and this lets us use the surface like a sprite. So what does the new character generation code look like?
surface_set_target( CharacterSurface );

var surface_x_offset=(character&127)*8
var surface_y_offset=(character>>7)*8;
draw_enable_alphablend(false);
draw_set_alpha(0);
draw_set_colour(c_black);
draw_rectangle(surface_x_offset,surface_y_offset,surface_x_offset+7,surface_y_offset+7,false);
draw_set_alpha(1);
|
|  Plot pixels here....
|
draw_enable_alphablend(false);
This is the crux of things. We then plot pixels into the 8×8 character block whose pixel location is (surface_x_offset,surface_y_offset). Once done, we can then print everything, just as we did before but with custom characters – which is pretty sweet.
So we now have custom sprites, and characters…. how can we improve the rendering so it more closely resembles a C64? I initially started by saving things like scrolling and colour registers each scanline, so that when I drew the frame at the end, I could reproduce the final look of the screen better.
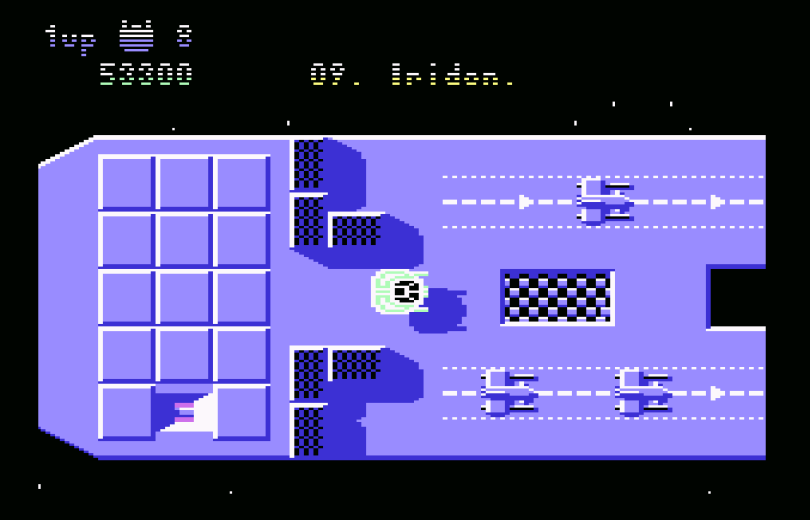
For example, in Uridium, we have a static panel at the top, and a scrolling section underneath it. So if I record what the scroll register is every scanline, I’d know that on scanline (say) 42, it changes from 0 (the static part) to (say) 4. I can then offset from line 42 downwards by 4 and get the display to scroll just like it should.
Now, you would expect this to work perfectly….except for one minor issue. Usually, by the time I’ve come to display the current screen, it’s already starting to change. There is around 70 scanlines at the bottom, and this is where a C64 game programmer would process the actual scrolling, and move the whole screen to the left. So what actually happens, is I get a few pixels smooth movement, than when the characters are shifted, everything stutters. I have the right scrolling value for sure, but since only part of the current screen is in the state it should be, the effect just doesn’t work. The same is true of many things in fact. Even sprite memory may change as the raster line progresses down the screen. Many games and demos do software scrolling through sprite memory. So what a sprite shape is like at the top of a single frame, may be vastly different at the bottom. The only way around this, is to render the display, as we emulate the machine. This is called scan line emulation, and next to just dumping the whole screen as we’ve been doing, it’s the simplest form of emulation rendering.
Or it would be, If I was drawing every pixel with the CPU. In fact if I was drawing everything with the CPU, then this would be reasonably trivial to do as we’d just work out all the sprite and character locations each scanline, but because we’re using the GPU to render characters, sprites, borders and background colours we can’t easily or quickly, build up that many “little” sprite sections. So the easiest, and fastest way for me to do this, is instead of rendering pixel lines, I render whole character lines. So when a character starts to get drawn by the raster, I draw the whole thing – before the CPU emulation has. This IS inaccurate, there’s no getting away from this fact. But it’s a compromise that helps us keep speed up, and makes this possible. The thing that does help us though, is that games tend not to do anything too radical such as changing lots of things every scanline – it would suck up too much CPU time, and the game would suffer. The only thing that gets in the way of this theory really, is a Sprite Multiplexor – but I’ll get to that later.
So now what happens, is as we emulate the CPU and it finishes a scanline (after about every 63 emulated CPU cycles) we check to see if we’re at the start of a new character row (once every 8 scanlines), and if so we draw all these characters to a surface – as shown above. It’s important to note we don’t draw directly to the screen because we still want to try and render colour bars – which ARE every scanline. So, every scanline (rather than every 8th), we draw the current background colour directly to the screen, then every 8th we also draw the character to it’s own surface. Then at the end of the frame we simply render each surface on top of each other to form the final display. One thing that does help here, is that the VIC chip rules has it’s own rendering rules. One of which, is that once it’s started rendering anything – a character or a sprite, it’ll keep going until it’s finished. This means coders couldn’t get too creative on raster splits, and means when we render a whole row – it’s pretty much what the VIC chip did anyway.
This is all reasonably simple – but at the same time, a pain in the ass. Each character line we have to recalculate the screen address, the character map base address, Hires or MCM, the X and Y scroll registers and what needs to be invalidated and re-created. But once we’ve done all this, we have a single character line, in the right place, an looking more or less correct. Do this 25 times, and we have our screen, and best of all, as we’ve rendered it in more or less the correct emulated time slot, there’s no longer any juddering as things scroll about.
Okay…. so that was characters – and background colours. What about sprites and the dreaded sprite multiplexor? Well, let’s take a quick recap on sprites. The C64 has 8, and you can locate them anywhere, and use any one of 256 shapes within a VIC graphics bank. While the VIC rule of “I’ve started drawing so I’m going to keep going until I’ve stopped” does help, you can in fact cheat a little, and not only move it by changing the X coordinate, but change its shape each line as well. Because of this… our rendering isn’t going to be as precise.
What we can do though, is when we detect that a sprite Y coordinate starts on this scanline, we can just render the whole thing – there and then. This means we can display way more sprites than the VIC could, and we’ll have a more solid image than many games actually managed. But… and this is where things do fall down a little….because we’re not able to change the X position dynamically, we can’t “rip” sprites. This may not seem terribly important, but actually this was vital to many games for doing a clean raster split between a game world, and the status panel.
Imagine if in the game shown above, sprites went off the top. Normally, they would simply go over the top of the panel, but C64 coders were sneaky beasts, and they’d move the sprite off screen to the right when the raster is drawing the panel, then bring it back on during the game area, giving the impression than sprites were moving under the panel area, while in reality, the VIC is ripping the sprite into 2 parts. This was such a neat – and sneaky trick, that it was used outside of the C64 on other hardware – like the SNES (Super Nintendo). We used this trick on a game called Uniracers to give a perfect raster split in a 2 player split screen racing game. Nintendo had never seen this before, and they insisted that it was tested it on all older hardware before allowing us to use it, as it technically violated the SNES hardware rules – but just like the C64, it work just fine.
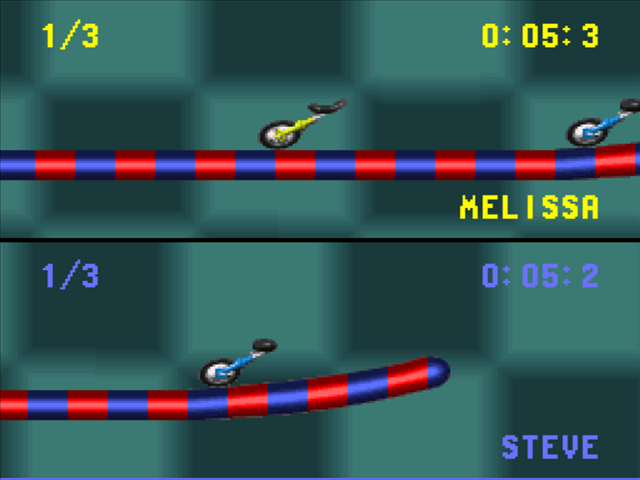
Technically, we didn’t need the 2 black lines in the middle of the screen, but it was so weird without them, we added them in purely for aesthetic purposes.
At the time of writing, sprite ripping is still a problem to be fixed, although in theory…. you could do it post rendering, in a shader. As emulation progresses, I could remember all the X positions, and as the surfaces are combined later I could offset the sprite as it’s rendered – in theory. Also in theory, I could delay rendering the sprite until the end of it – or until some of the hardware registers change, and then flush out the sections that haven’t, thereby building a sprite up in “chunks”. This is much more likely, as it’s relatively straight forward to do – even if it is a pain in the arse.
But let’s get back to the multiplexor. So we’ve solved the core issue, we can now render more than 8 sprites quite happily, except for one thing… another VIC rule. Sprites will always maintain their order. This is to say, sprite 1 will ALWAYS be on top of sprite 2 (and so on). But because we render sprites as we come to them, sprite order is determined by how low down the screen they are. So sprite 6 at Y position 100 will be over the top of sprite 1 at Y position 99. This is no good, and messes up the whole look of most games, especially as they tend to reserve sprite 0 as the player so you’re always on top.
To solve this, I need more surfaces – 7 more to be precise. I already render the sprites to their own surface to avoid messing with the character map rendering, but now I need 7 more so that each sprite will render to it’s own surface. I can then combine all of these at the end – in the correct order, and then every sprite 1 will always be on the top of every sprite 6, no matter where it’s drawn. This makes everything look much better – especially games like Uridium above, as the shadow is lower down the screen of the main sprite, it was hiding part of it, where as now is sits happily under it, as it should. With all this done, the basic frame rendering now looks something like this…..
The last thing to consider with sprites, is a special mode they have, which lets you put them behind the background. This is pretty complicated to render, as in theory, you’re supposed to put sprites behind any character map pixels, but maintain sprite order. So even if sprite 1 was behind a solid block of pixels, if sprite 2 overlapped the location of sprite 1, then part of sprite 1 would obscure sprite 2. This is complicated, horrible – and we’re just not going to do it. It’s an effect that only a few games might have used, and just isn’t something we can do – while keeping the speed up, so we just won’t even try.
But we can cheat a little…. by creating another 8 surfaces, we can render sprites that go behind the screen onto them, and then we can combine them first, then the character map surface, and then finally, the sprites in front, to get our final screen, and a pretty close proximity of the C64 display.
Well….almost. There is yet another catch. In MCM, when you put sprites behind the screen, they only go behind 2 colours, but remain in front of 2 (the background colour, and one or the multi-colour mode colours). This just isn’t possible at the moment…so again, we’ll have to ignore this for now, but even without this feature, we still get a pretty nice display, and everything looks “almost” right.