In this part, I’m going to start looking at sprites, and see if there’s anything I can do in order to display “something” so I can better see games running. The simplest thing to do, is to just display a blob, but before we do that let’s look at sprites in general.
The C64 can have 8 hardware sprites, and each sprite is 24×21 pixels in size. They’re such an odd size because by making them this size, it means they’ll take up 63 bytes, and this in turn gives it a nice boundary for the hardware to render from (a sprite shape every 64 bytes). The first 3 bytes make up the top row, while the next 3 row 2 and so on… in HIRES mode, 3 bytes (8 bits per byte) gives 24 pixels, while in MultiColourMode (MCM), the resolution (but not size) is reduced to 12×21. This because it takes 2 hires pixels to make one MCM pixel. Since 1 bit gives 2 values (0 or 1), 2 bits gives us 4 values (0,1,2 and 3). This means MCM mode gives us 3 colours and a transparent background, although 2 of the colours are shared between all sprites. Each sprite can have an X and Y coordinate ranging from 0 to 511 on X, and 0 to 255 on Y; however there are hidden areas to allow you to smoothly bring them on and off the screen – as shown below

Now the big problem with GameMaker is that there are no “dynamic” sprites/textures that the CPU can access directly, and unfortunately emulators LIVE by the grace of dynamically generated content via the CPU, so this is a big problem. On normal emulators, the content is dynamically rendered – on the fly – directly from the C64s emulated memory, pixel by pixel as the emulated frame progresses. This simply isn’t possible with GameMaker. The only way to do this, would be to literally plot every pixel as you draw them. At the very least that’s 320×200 (64,000) pixels – JUST for the character map screen, never mind the border, and multiplexed (and possibly X and Y expanded) sprites. So that’s obviously not possible.
But I still wanted to “see” something, so I decided to just create a sprite in GameMaker that was 24×21 pixels in size, and then just render it where the sprites should be. These are rendered over the top of the character map screen.
Once you’ve decided to just render a blob, all you really need to do is read the positions from the C64’s virtual hardware registers, and then loop for all 8 sprites, and your done – pretty easy.
var spritex = pRom[# $d000+(sprite_number*2),0];               // X
var spritey = pRom[# $d001+(sprite_number*2),0];               // Y
spritex= spritex+(((pRom[# $d010,0]>>sprite_number)&1)<<8);    // X significant bit
Since we’re still just rendering at the end of a frame, this of course won’t doesn’t deal with multiplexors, but you can see things move, and get an idea if the game is playing properly. You can also take into account the X and Y expand registers, and double the size using a simple *2 scale if need be.
Now that I had the basics running, I started to wonder what I could do next…. Should I move onto sound? This was the whole reason for starting the project in the first place, or should I try and carry on with the rendering and “somehow” do the dynamic stuff. I was about to play more with the rendering loop, when I suddenly though back to Xe03, the retro shooter I’m (still!) writing. It does a nifty trick in order to do it’s rendering – it manually rotates sprites into the correct position, and then caches it until they actually change. This proves to be a massive speedup, as not only do you hardly ever need to rotate things again, but when you do, it’s “on demand”, meaning the work of generating a whole sprite animation is broken up over several frames.
At this point I had my brainwave…. why can’t I do the same here with C64 sprites? Sure, rendering 100,000 points a frame is stupid, but how about 500 or so for a single sprite? I’d been playing with a small point test a few weeks before and knew point power was pretty good on modern hardware – I got about 70,000 being rendered in a tight loop. This gave me confidence that could at least handle a few thousand at time in a more complex program. So knowing this, I knew I could render a small number of pixels to a 32×32 surface (keeping it a power of 2 for hardware compatibility reasons only), and then keep it lying around, caching it until the memory for it changes. The problem is how do I know if the memory changes? it could be quite a chore to track every single byte being written. But actually …. I don’t have to as the CPU emulation already does all memory changes by going through the Poke() function.
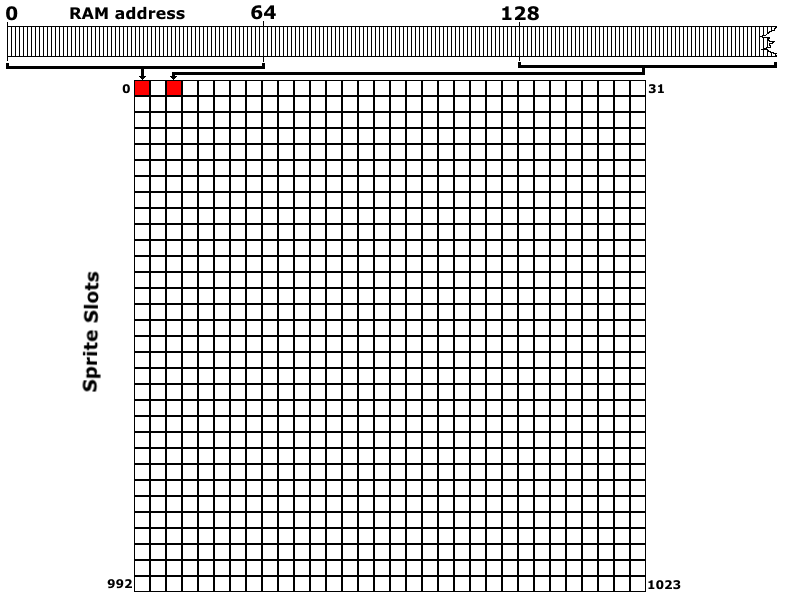
So just how many sprites can you get in 64K of RAM, where each sprite takes 64bytes? Well 1024 – obviously (64K being 64*1024), and so if you track changes to sprite “blocks” rather than individual bytes of memory, then it’s a lot easier to track – especially since we only have to change the Poke() function. So what I did was create an array called sprite_changed which has 1024 locations in it, and then on Poke(address,value), I take the address and divide it by 64 (by doing a right shift of 6), then set the value in the sprite_changed[address>>6] array to 1. This maps pretty easily as shown in the diagram below….

Then, when rendering the sprites I simply have to figure out where the sprite lives in the array by taking the shape value (which is 0 to 255) multiplying it up by 64, adding on the base address of the current VIC “bank” (the VIC has 4 possible banks it can use; $0000, $4000, $8000, or $c000), and then check to see if it needs refreshed. That way, changes are minimal, and since you only plot pixels you can see, you never really need to plot a full 24×21 sprite – as some pixels are on, and some are off. Each time a sprite shape is used, I create a unique 32×32 surface, and then render the points to it, thereby creating the actual C64 sprite from the emulated memory. I generate the sprite by clearing the surface, and plotting points – like this….
        for(var yy=0;yy<21;yy++){
            var index=0;
            for(var xx=0;xx<24;xx+=8){
                var pix8 = pMem[# address++,0 ];
                if( (pix8&128 )!=0) draw_point_colour(xx,yy,$ffffff);
                if( (pix8&64 )!=0) draw_point_colour(xx+1,yy,$ffffff);
                if( (pix8&32 )!=0) draw_point_colour(xx+2,yy,$ffffff);
                if( (pix8&16 )!=0) draw_point_colour(xx+3,yy,$ffffff);
                if( (pix8&8 )!=0) draw_point_colour(xx+4,yy,$ffffff);
                if( (pix8&4 )!=0) draw_point_colour(xx+5,yy,$ffffff);
                if( (pix8&2 )!=0) draw_point_colour(xx+6,yy,$ffffff);
                if( (pix8&1)!=0) draw_point_colour(xx+7,yy,$ffffff);
            }
        }
Not quite ideal, but pretty simple. And actually, not a lot of points (in the grand scheme of things). Now obviously if everything were to suddenly invalidate, it’ll hiccup and stutter horribly, but that shouldn’t happen too much. Once generated I then draw the sprite with a draw_surface_part_ext() using the top/left and the correct width and height. If I allocate surfaces on demand, then it also means only sprites being drawn – or have ever been draw, will take up space.
The issue I have with this… is that while it’s okay for sprites, it’s impossible to use for the character map. I simply couldn’t afford the 1000 texture swaps per frame this would incur (the character screen is 40×25 = 1000 characters), so… I hatched an evil plan. Who’s to say each sprite is a single surface? What if it was just a “slot” on a large texture page? Well, as it happens, 1024 32×32 sprites, fit nicely on a 1024×1024 surface. So using the sprite index into memory, I use this as a slot onto the 1024×1024 pixel image (or rather 32×32 sprites image). This new method is shown below…
When a sprite is invalid, I set the sprite surface, clear the selected square with a filled rectangle – and importantly using an alpha value of 0, and then plot points into the region I need to change. Sure, a lot of the surface is empty, but it’s a lovely big cache, and it “just works” for ALL of the sprites in the C64, no matter what mad things the game tries to do! Plotting into the correct slot is as simple as adding on the base coordinate of the slot itself – like this…..
        for(var yy=surface_y_offset;yy<(surface_y_offset+21);yy++){
            var index=0;
            var xx=surface_x_offset;
            for(var xp=0;xp<3;xp++){
                var pix8 = pMem[# address++,0 ];
                // do plotting....
                xx+=8;
            }
        }
Drawing the resulting sprites, lets us generate an image like the one below…..

……….and so all of a sudden, I have PROPER C64 sprites being rendered!! Of course… as you might notice, it isn’t quite right. This is because most games use Multi-Coloured Mode (MCM) sprites, not Hires ones.
Still, that’s a pretty easy to feature to add, but actually… I need to step back a bit and think about it. I don’t want to have to regenerate the image every frame if they change any of the colours. The Hires one is fine, as I generate it as white, then tint it using vertex colours to colour tint it, but with MCM sprites, that’s not possible…. I feel a shader coming on.
What I did, was rather than generate the sprite using the actual RGB of the colours set at the time, I create the sprite using “special” colours, then I set constants for the current colour set at draw time, and then convert them on the fly in the shader. This allows me to remap the colours of the sprite to whenever the game sets – without rebuilding the sprite bitmap. I use grayscale of $C0C0C0, $808080 and $404040, and while the shader isn’t great, at least it’s simple! Here it is….
void main()
{
    vec4 col = texture2D( gm_BaseTexture, v_vTexcoord );
    if( col.a==0.0 ) discard;

    float c = col.r*255.0;
    if(c == 192.0 ){
        col = MCM_Colour1;
    }else if( c == 128.0 ){
        col = v_vColour; ;
    }else if( c == 64.0 ){
        col = MCM_Colour2;
    }else{
        col = v_vColour * col;
    }

    gl_FragColor =  col;
}
As you can see… there’s nothing special here – graphics hardware is pretty fast, and I don’t have to do too many fancy things for a few sprites these days. Once I get the extra colours from the C64 HW registers. decode them into 2, vec4( ) shader values (so the ARGB values are 0.0 to 1.0, and not 0 to 255), and then set the constants…this is what I get…..

This looked pretty good to me! So what does the resulting sprite cache look like? Well saving out the single, big sprite surface I don’t have to imagine what it looks like, I can see exactly what it’s like…..
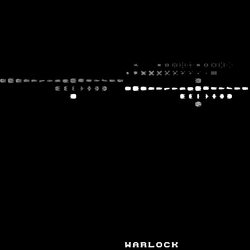
The image above shows the sprites from the title page of Uridium. The WARLOCK sprites at the bottom are actually from the crack intro, not the game. Interestingly, many games reuse slots, presumably copying sprites from elsewhere on demand, so the invalidate cache slot idea works a treat for this as well.
Lastly… many intros scroll text through sprites, as they can go over the top of images easily, and again… the invalidate cache concept works great for that. With all this enabled… this is what we now get….
This whole concept appears to work great, dealing with everything the C64 has to throw at it, while the cache means it’ll never get so mad as to utterly kill performance. It’s certainly much further than I thought I was ever going to get with this emulator, and I was now even in a good position to start thinking about the character maps, as well as bitmaps as I know the same system should work just as well on those
In the next part, I’ll briefly deal with character sets (much the same as sprites), and how I swapped from just drawing everything at the end, to a system that produces more realistic results.