In this part 4, we’re going to take a look at the guardians, their movement, and graphics. The graphics are pretty much done the way we’ve done them all of them so far really, read the data, create a surface and build the bitmaps. The movement and locations are just another part of the level data, and are broken into horizontal and vertical. Lets start with the horizontal ones first – since the first level has one of these, it’ll allow us to quickly test things. First, we’ll need a new object oHBaddie. Then lets make a solid white sprite, 16×16 in pixels and assign it to that object.
With that done, lets read the data from the level. Looking at the document, the Horizontal guardians start at offset 702, and run to 732. Each level can have 4 horizontal baddies (along with 4 vertical ones as well), and each can be normal or slow, have a colour, an X,Y Start, and extreme left and right values. If the first value is 255, then we have no more baddies in this level. Pretty straight forward, so here’s the code to read them.
// get horizontal guardians
var add = base_address+702;
baddies = 0;
for(var bb=0;bb<4;bb++)baddies[bb]=-1;
for(var b=0;b<4;b++)
{
    var baddie = [];
    var a = buffer_peek(game,add++,buffer_u8);
    if( a!=255)
    {
        baddie[0] = (a>>7);     // baddies speed 0=normal, 1= slow
        baddie[1] = (a&7);      // colour
        a = buffer_peek(game,add,buffer_u16);
        baddie[2] = (a&31)*8;           // X start!
        baddie[3] = ((a>>5)&$f)*8;      // Y start!
        add+=3;
        a = buffer_peek(game,add++,buffer_u8);
        if((a&7)<4){
            baddie[4] = 1;
        }else{
            baddie[4] = -1;
        }
        a = buffer_peek(game,add++,buffer_u8);
        baddie[5] = (a&31)*8;           // extreme LEFT
        a = buffer_peek(game,add++,buffer_u8);
        baddie[6] = ((a&31)*8)+6;       // extreme RIGHT - we add 6 so that we turn around on the LAST frame of the animaton
        baddies[b] = baddie;
    }else{
        break;
    }
}
level.Hbaddies = baddies;
As you can see, this is a simple loop of 4, we check the first byte read and if its not 255, we read out the various values as dictated by the document. After reading the X and Y we skip a few bytes so we can then read the initial direction and the extreme left and right values.
Next we need to add more to our ChangeLevel script, by first making sure we delete any old baddies!
with(oHBaddie) instance_destroy(id);Then at the bottom we’ll create new some new oHBaddie instances based on these values.
var baddies = level.Hbaddies;
for(var b=0;b<4;b++)
{
    var baddie = baddies[b];
    if( baddie == -1 ) break;

    var iBaddie = instance_create_depth(0,0,-100,oHBaddie);
    iBaddie.sp = baddie[0];
    iBaddie.col = GetColour(baddie[1]);
    iBaddie.x = baddie[2];
    iBaddie.y = baddie[3];
    iBaddie.dir = baddie[4];
    iBaddie.left = baddie[5];
    iBaddie.right = baddie[6];
    iBaddie.sprite = CurrentLevel;
}
Again, a pretty simple loop. Create an instance, set the various variables from position to direction, speed etc. If you now run this and flick through the levels, you’ll see white blobs at the correct locations. Next, lets get them to move! We do this by adding in some simple code to a new STEP event in the oHBaddie object, like this…
if( dir<0 && x>left) x += dir*(sp+1);
else if( dir>0 && x<right) x += dir*(sp+1);
if( x<=left ) dir = -dir;
else if( x>=right ) dir = -dir;
So, taking a look at this you can see depending on the direction, we will move left or right. Then, if we pass the extreme edge, we flip direction and next frame we’ll start moving the other way. The reason we use dir* is to allow for a normal and fast mode, this value will be either a 1 or 2. We could of course simply have this be a speed value, and add it on, then negate it to flip.
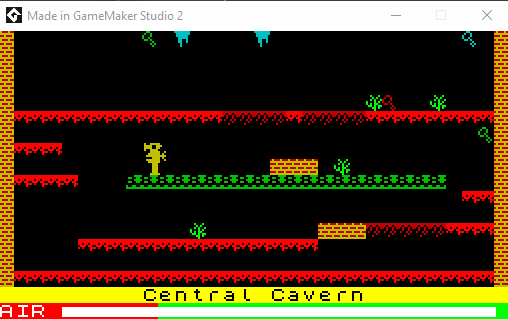
So, once you add this code in and then run it, you’ll now see these white blobs move, just like the game!
Now that everything is moving, we’ll want to get the actual graphics in place. These graphics are common to horizontal and vertical baddies, so we’ll stick this at the bottom of the LoadGame() function. Each sprite is 16×16 pixels, and 32 bytes in size so that each bit is actually a pixel – exactly like the other images. This section will read the graphics memory into a buffer for processing later, each line being a u16 (2 bytes), and 16 lines high.
// Extract guardian graphics
var Guardian = [];
var add = base_address+768;
for(var w=0;w<(8*16);w++){
    a = buffer_peek(game,add,buffer_u16);
    Guardian[w] = ((a>>8)&$ff)|((a&$ff)<<8);
    add+=2;
}
level.Guardians = Guardian;
global.guardian_graphics = -1;
Next we’ll actually turn these into usable sprites, and just like the previous ones, we’ll make a single large surface that we’ll store the whole games guardian graphics on. These will be white sprites, so that we can colour them properly at render time.
// guardians
if(!surface_exists(global.guardian_graphics))
{
    global.guardian_graphics = surface_create(8*16,16*20);

    surface_set_target(global.guardian_graphics);
    draw_clear_alpha(0,0);

    for(var lev=0;lev<20;lev++)
    {
        var blocks = levels[lev].Guardians;
        // 8 frames
        for(var i=0;i<8;i++)
        {
            draw_set_alpha(1);

            var xx = (i*16);
            for(var yy=0;yy<16;yy++)
            {
                var row = blocks[(i*16)+yy];
                for(var xi=15;xi>=0;xi--)
                {
                    if( ( (row>>xi)&1)!=0 ){
                        draw_point_color(xx+xi,yy+(lev*16),$ffffff);
                    }
                }
            }
        }
    }
    surface_reset_target();
}
A quick look through this function we can see we loop through 20 levels (again), then 8 frames in each level, then line lines and then finally 16 pixels. Now that we have this large texture, we should be able to draw this in the level easily enough. Create a DRAW event in oHBaddie object, and add this….
/// @description Draw and animate a guardian
var frame = 3-((x>>1)&3);
if( dir>=0 ){
frame +=4;
}
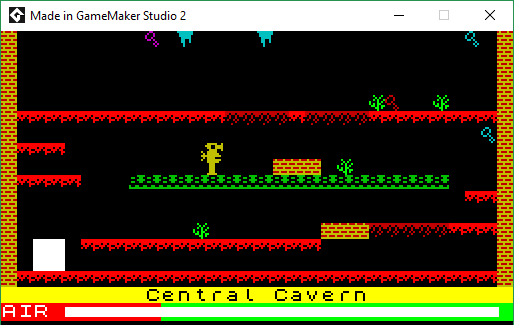
draw_surface_part_ext(global.guardian_graphics, frame*16, sprite*16,16,16, x&~7,y, 1,1,col,1);If all goes well, you should see something like below, and you can even flip through the levels and see them, or rather those with horizontal guardians at any rate. It should be noted that it won’t work completely, as Manic Miner has many, MANY special cases, so this will just do the normal levels.
So, lets go over this little function, as there are quite a few tricks in here, not least how it even animates without a counter! Most spectrum games cheat when doing graphics, either by storing graphics in a pre-rotated form, or by actually having the graphic move through the bitmap. Manic Miner does the latter. In effect the lower few bits of the X coordinate specify the actual frame the sprite is on. So, the animation moves through 8 pixels, and we have 4 frames, so each frame is set every 2 pixels. To select the frame we’ll do this: ( floor(x/2)&3 ), although you’ll notice I do a x>>1 instead of floor(x/2). a shift right does an integer divide, so that’s much faster than the divide and a floor. Next the &3 keeps the lower 2 bits of the value, giving us a number of 0 to 3, or the 4 frames we need.
The second set of animations (for when walking right) are stored after the first, so we add 4 frames to offset correctly. Lastly, you’ll also notice a 3- …. this is because for some reason, the animations are stored backwards. Yeah, I don’t know why either. Lastly, when drawing you’ll see the x&~7. This takes the value 7 (lower 3 bits set of a 32bit integer) and INVERTS it giving us $FFFFFFF8, which we then use on X so that we draw on 8 pixel boundaries only. This allowed the spectrum to draw graphics on byte boundaries, without having to rotate bitmaps, or do anything that would suck up CPU time, even though to us it’s just a pain!
Lastly for this week… lets add the Vertical guardians. We’ll need a new oVBaddie object, and a new section in LoadGame( ) (just under the Horizontal Baddies section)
// get vertical guardians
var add = base_address+733;
baddies = 0;
for(var bb=0;bb<4;bb++)baddies[bb]=-1;
if( i==8 || i==10 || i==12 || i=13 || i==14 || i=16 || i==17 || i==18 || i==19 )
{
    for(var b=0;b<4;b++)
    {
        var baddie = [];
        var a = buffer_peek(game,add++,buffer_u8);
        if( a!=255)
        {
            baddie[0] = (a&7);          // colour
            a = buffer_peek(game,add++,buffer_u8);
            baddie[1] = 0;              // graphic start
            a = buffer_peek(game,add++,buffer_u8);
            baddie[2] = a;              // Y start!
            a = buffer_peek(game,add++,buffer_u8);
            baddie[3] = (a&31)*8;       // X start!
            a = buffer_peek(game,add++,buffer_s8);
            baddie[4] = a;
            a = buffer_peek(game,add++,buffer_u8);
            baddie[5] = a;              // extreme TOP
            a = buffer_peek(game,add++,buffer_u8);
            baddie[6] = a;              // extreme BOTTOM
            baddies[b] = baddie;
        }else{
            break;
        }
    }
}
level.Vbaddies = baddies;
You will see the big line with i==8 || i==10 || i==12 etc… this is because only certain levels have vertical guardians – this is part of those special cases I was talking about. Next add this section to the ChangeLevel function.
with(oVBaddie) instance_destroy(id);
var baddies = level.Vbaddies;
for(var b=0;b<4;b++)
{
    var baddie = baddies[b];
    if( baddie == -1 ) break;

    var iBaddie = instance_create_depth(0,0,-100,oVBaddie);
    iBaddie.col = GetColour(baddie[0]);
    iBaddie.y = baddie[2];
    iBaddie.x = baddie[3];
    iBaddie.sp = baddie[4];
    iBaddie.top = baddie[5];
    iBaddie.bottom = baddie[6];
    iBaddie.dir =0;
    iBaddie.sprite = CurrentLevel;
}
If we run this, the vertical baddies will appear in the right locations, so now we need to have them move! Add a new STEP event in oVBaddie, and insert this code…
if( sp<0 && y>top) y += sp;
else if( sp>0 && y<bottom) y += sp;
if( y<=top ) sp=-sp;
else if( y>=bottom ) sp=-sp;
Just like the horizontal version, this does the same but using Y instead. If you run this and then skip to level Wacky Amoebatrons you’ll see white blobs bounce up and down. So the last thing is to add some sprites to this as well, although it should again be noted these won’t be “right” as we’re not putting in any special animation code, but it’s nice to see actual graphics in there. So if you copy the oHBaddie draw event and paste it into the oVBaddie one, that’ll do for now. once you’ve done that, you should have something like this…
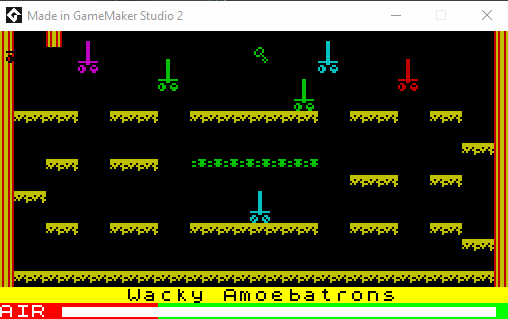
You can see at the top left, there is a black baddie apparently stuck there, this is again down to special case code, something we could fix if we were doing a full remake, but not something I’m especially worrying about right now.
Next time in part 5, we’ll finish up by getting Miner WIlly’s graphics, start location and that of the exit or portal as it’s called.