So before I get into doing real game stuff with Z88DK – the cross platform C Compiler for the ZX Spectrum Next, I want to get things setup, and some basics for people to look at.
First, we need to download the compiler and get it installed and ready to go. You can get Z88DK from the nightly build site here:
Click on the link above and download the latest version (or select the z88dk-win32-latest.zip one), unzip and stick it somewhere – I stuck mine in C:\Z88DK
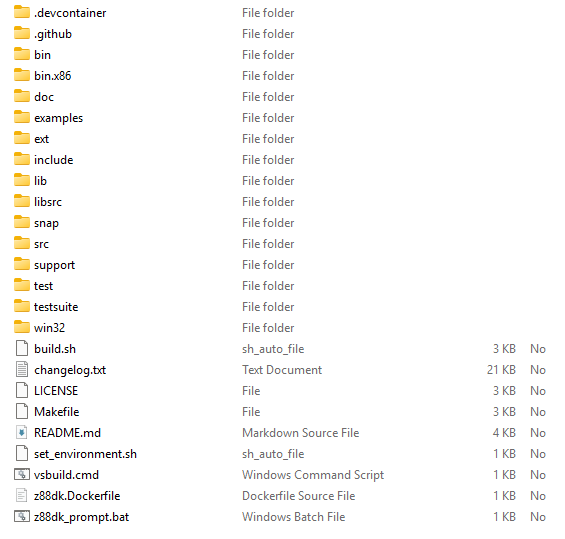
This folder should now look something like this. Next we need to setup the environment variables. You can either run the z88dk_prompt.bat file each time, or add these to your environment. On windows you can get to this by running the “Environment Variables” program shown below (type “edit env” into the start menu).

And add these (which you’ll see above) – saying you’ve stuck it in the same place as I have, or update as need be.
Z80_OZFILES=c:\z88dk\lib\clibs
Z88BASE=c:\
Z88DK=c:\z88dk
Z88DK_DIR=z88dk
ZCCCFG=c:\z88dk\lib\config
Next you need to add it to the path – which you can also set in the above dialog by editing the User PATH.

You’ll notice I use %Z88BASE% in the path, which makes it easy to move to a new location if I ever want to. We point this to c:\z88dk\bin so the compiler could now be found for building our programs. You might need a reboot for the path to take effect, but after that, typing “zcc” on the command line should run it, and show you the command line options like this…

Now that we’re setup, we need to get a basic program going. We’ll be using makefile‘s so if you don’t have “make.exe” somewhere, you’ll need to install that as well – and again might need a reboot. Also, if it’s not in the path, you’ll need to add it as well.
https://gnuwin32.sourceforge.net/packages/make.htm
Our mini framework will consist of 4 files, main.c, data.c, kernel.asm and irqs.asm. Main.c will be the start up and controlling file, with the main loop etc in there – but be aware, the actual files may well differ from the images as it’s a living project.
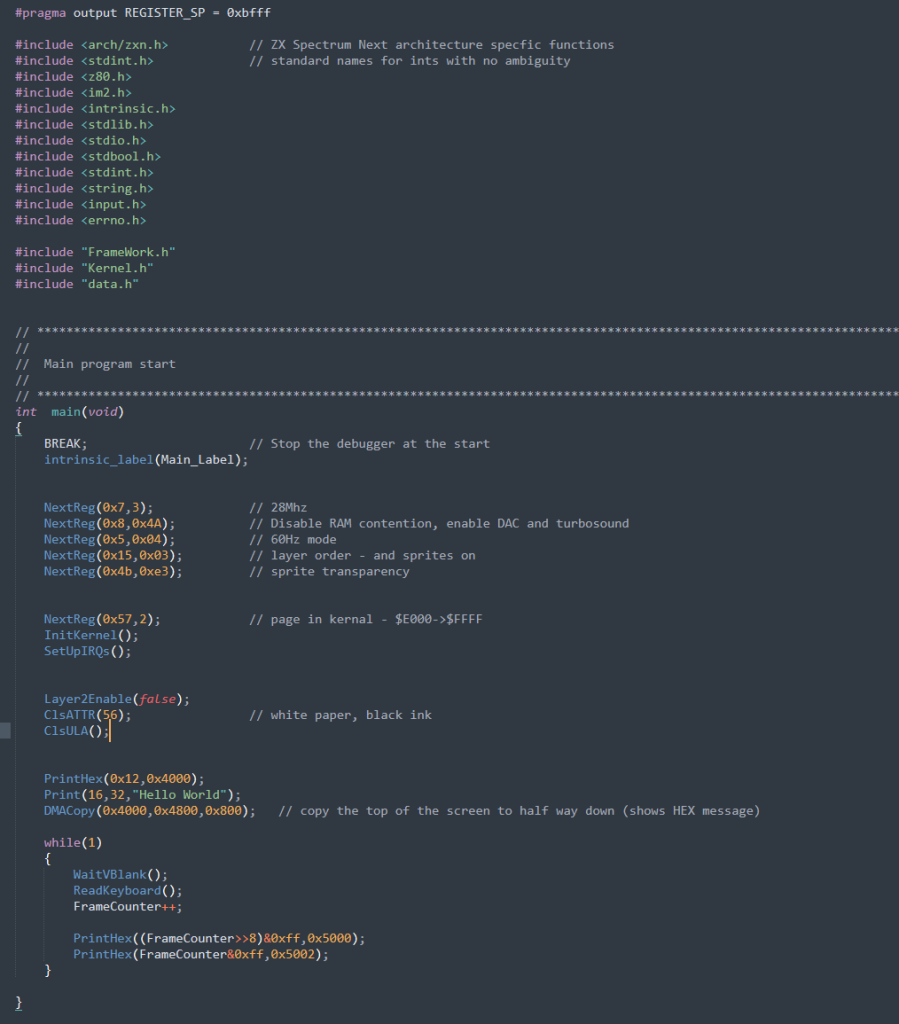
Most of this is simple enough, but I’ll go through a few bits. First the BREAK, which is a new addition that can be found in the “FrameWork.h” file. It simply injects CSpect‘s BREAK opcode, allowing us to stop wherever we want – in this case, after crt0 has run and called main(). Be aware thought this can cause a warning about code size to appear depending on where it’s used. Don’t worry though, it’s just a warning.

You’ll also see a load of NextReg( ) being set, Speed, 60hz mode and the like, all very straightforward.
But now it gets interesting. We then use a NextReg( ) to bank in our “Kernel“. This is in a custom SECTION that compiles our kernel code into a specific bank, at a specific address. This bank is never banked out, as it holds core functions – DMA, Loading, sprite functions, printing etc, and more importantly, our Interrupt service routine.
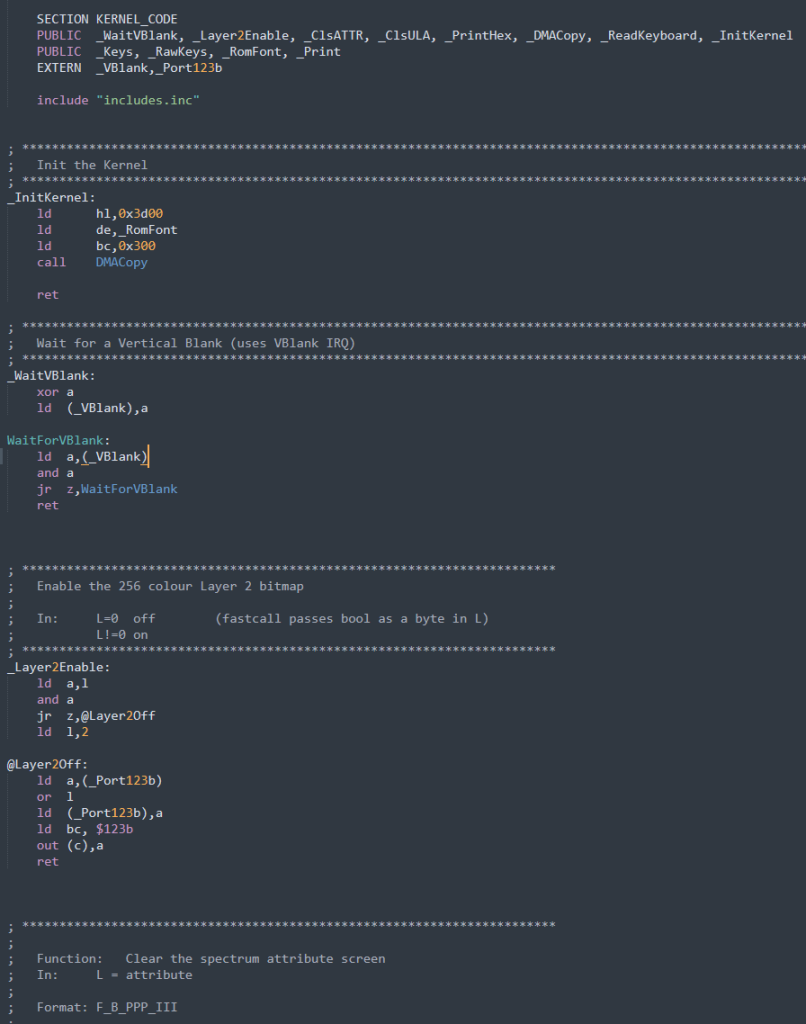
Here’s the start of the Kernel, it copies the ROM‘s character set locally – as we’ll be paging out the ROM a lot, and has our WaitVBlank routine that waits for the IRQ handler to service the Vertical Blank. Kernel.h allows the C code to interface with the ASM, using a mix of __z88dk_fastcall and __preserves_regs( ) function decorations.
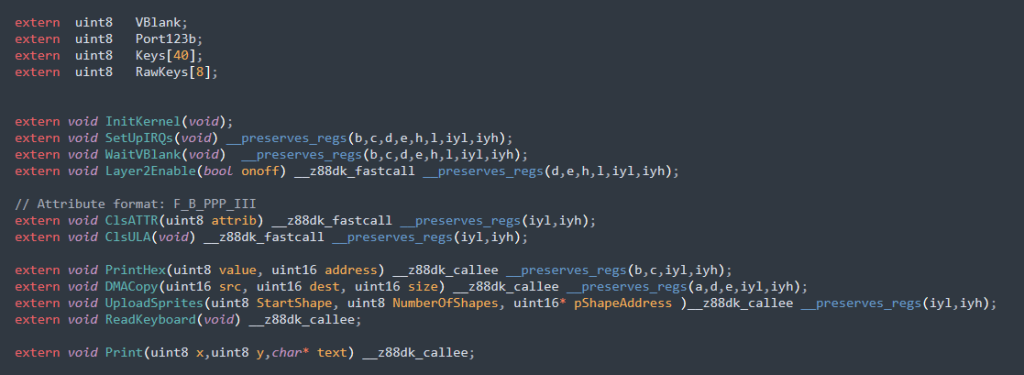
Our kernel handler also handles key presses, giving us a very simple array to check for key downs – ideal for game input.
The next thing after Kernel setup, is setting up the IRQs. This is a bog standard ZX Spectrum VBlank handler. You can see below we follow the Spectrums 256 byte vector array, with each byte being the same, and pointing to an IRQ handler at $FCFC, and it then jumps to a “proper” handler that can be much larger.
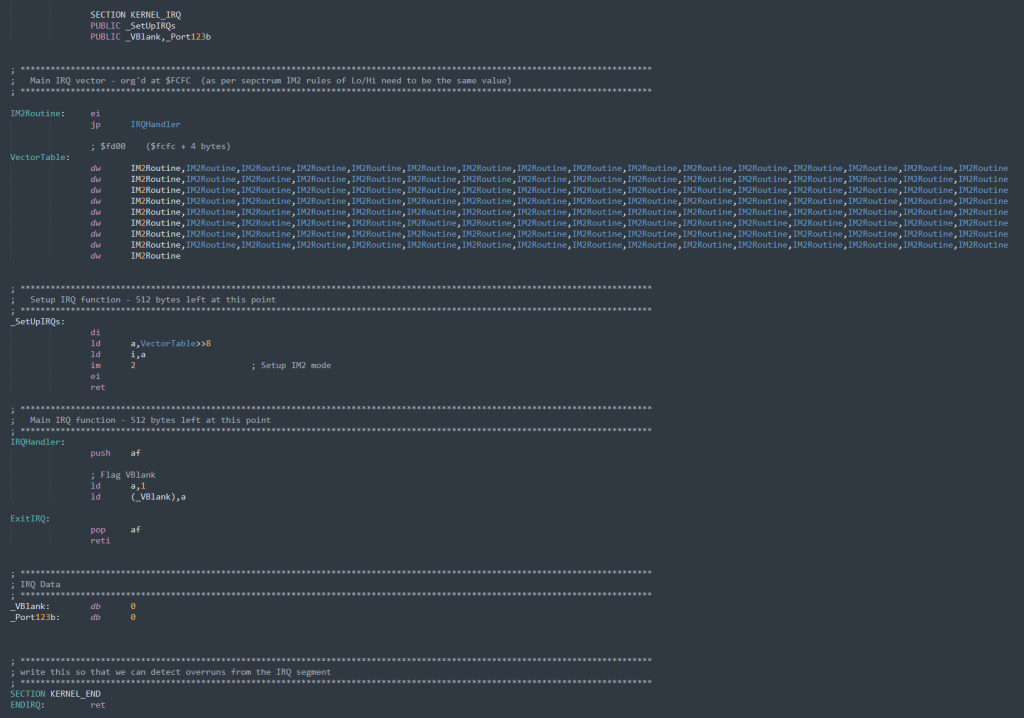
These days, you can use vectors to have separate handlers if you prefer, but we’ll not do that here.
Now you’ll remember I said the Kernel code is in it’s own SECTION (bank/segment/whatever), and we do this using a MMAP.INC file, like this.

Z88DK SECTIONs select the bank using PAGE_?? identifiers, so you can see above a name of PAGE_02_KERNEL_CODE, meaning the Kernel lives in bank 2. Following that, we have the ORG address, where we’ll compile the code to run at – as you can bank in any SECTION to any 8k bank address.
Lastly just under that, we have a shorthand alias; KERNEL_CODE. Now the reason for this is that means we can use this name in many files, and if we ever wanted to change the bank, we just need to change this file, not lots of source files.
Once the IRQ is setup, we then disable Layer 2, and clear the ULA screen. We print some Hex to the screen then DMA copy that section of the screen, a little lower – just to show DMA working.
Finally… we enter the main loop. Again, nothing complicated here. We wait for the vertical blank, and then scan the keyboard. This could be in the IRQ, but it’s not vital unless your framerate is terrible, and you’ll to capture keypresses over a longer period.

We increment a number for printing later, and then easily check for a keypress and print something. And that’s the code… nothing is staggeringly complex, but it all hangs together to get you going. While later updates will add a game engine and some more Kernel functions, they’ll mostly end up in a different depot as I want to keep a simple framework. However I will migrate useful Kernel functions into this project as well.
The next big thing we need to talk about, is the makefile. Now, I hate makefiles. It always takes me an age to get one up and running, but once you do, it’s easy enough to add files and expand it. This is a really basic framework, but it should be expanded to something that can be used as the basis of any game, and we’ll do that over next few weeks-ish.
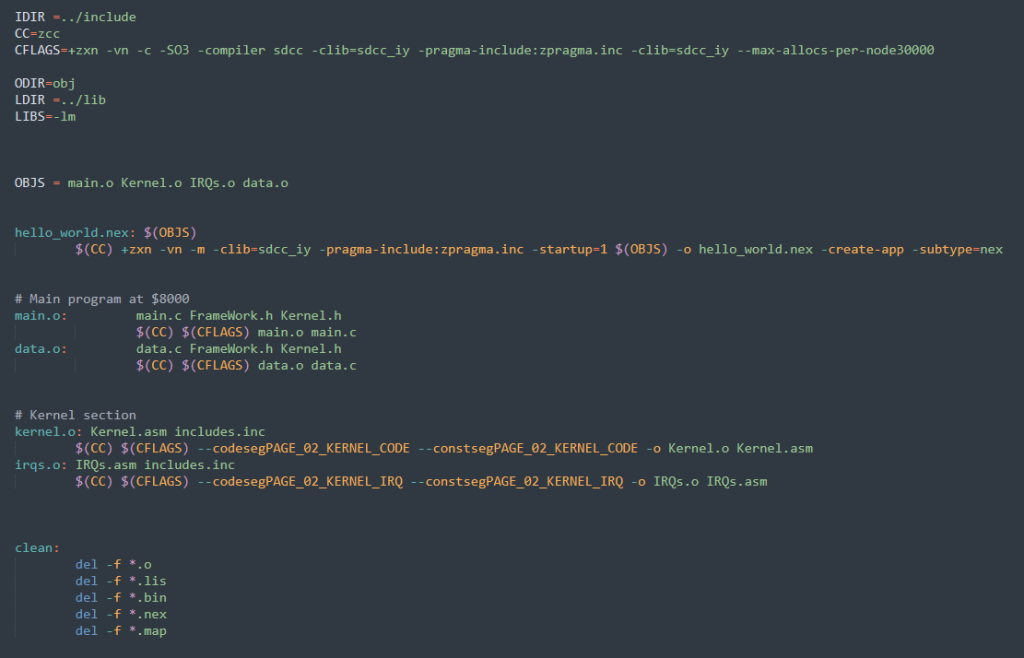
So here’s the simple makefile. Now I had a lot of help from the Next Team setting this up, and getting Z88DK all setup and working, so I’m eternally grateful to Gari Biasillo, and Allen Albright from the team for their help.
The top parts are just the preamble and ZCC default compile options etc. but the basics are when you hit hello_world.nex: This is the first target/dependency, and it looks for OBJS being up to date. OBJS being the list of object files. Now it then checks these dependencies to see they need to be rebuilt, so in the case of main.o, it checks main.c, FrameWork.h and Kernel.h. If any of these have a new file datetime than main.o, then main.o needs to be rebuilt. This is then done for the other .O dependencies, and once they’re all built, it’ll then link it all into hello_world.nex, ready to run.
Now you can make a specific target if you want using “make kernel.o“, or “make clean“. Make clean is the one you’ll use other than just typing “make” (as by default, it’ll make the first thing it finds, that being hello_world.nex)
Now, I’m not going to go into makefiles too much more, as I hate them, and this is “good enough”. You can do a lot more if you need to, but for us – this is just fine.
Lastly, there’s a couple of batch files. I use these from Sublime text’s build system so I can hit F7 and it’ll build and run for me.
a.bat – build and run if no error
r.bat – run using CSpect
Be aware, this is set to use a beta version of CSpect, one that has direct map file support via the -zmap command line. My Builder Patreon’s will have access to this, but it’s not quite ready for public release yet.
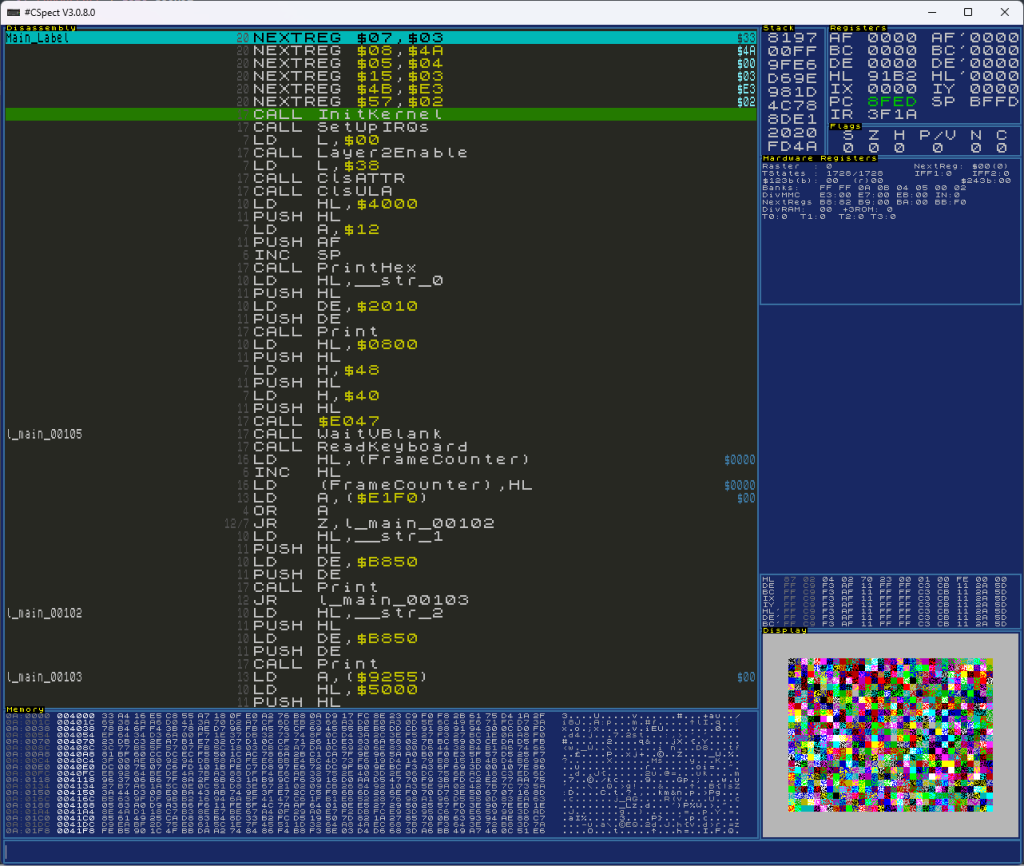
This is the new beta version, with proper labels that appear when the proper bank is paged in – it’s lovely. I am slowly working towards trying to get full source level debugging – which is nice for ASM, but utterly invaluable for high level languages like C – or compiled BASIC etc. But that’ll take longer.
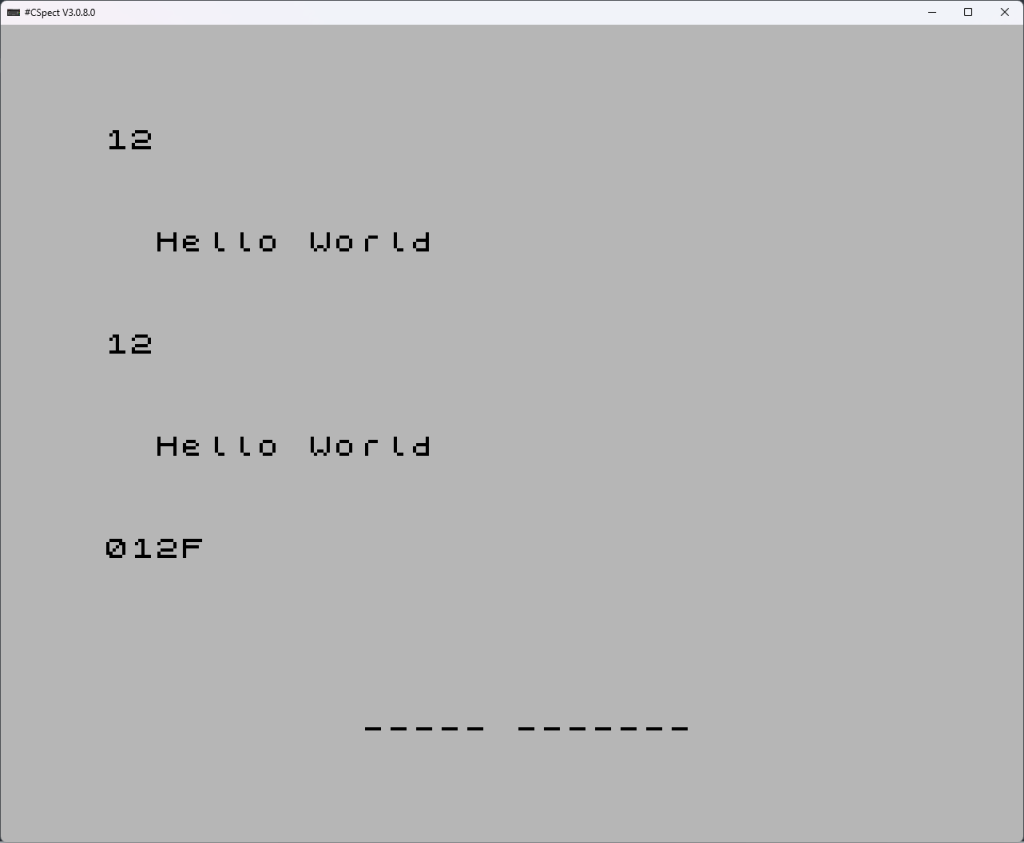
And this is what we should get, a counter at the bottom counting up, and those lines should change to SPACE PRESSED, when you press space. And there we go! Our first little, usable framework!
SO how do you get this? Well, here’s the GitHub depot (https://github.com/mikedailly/CFrame), and you’ll notice a BIN folder where we put CSpect and any other tools we want to use – graphics converters and the like. I normally also have a Graphics folder, but don’t need that here just yet, that’ll come.

So I hope this has made sense, if not – please let me know, as I’d like this to be an easy to follow tutorial for those wanting to get up and going. Let me know what’s easy to follow, and let me know if I’ve jumped any steps, or it’s too confusing to follow. Also be aware this disabled HEAP creation so there is no MALLOC. It’s not important for 8bit game creation.
Make sure to read through the code and match up to the descriptions above, and take your time. Nothing comes instantly, you need to tinker and think about things. If after that, you’re still not clicking, then please let me know on my discord.