Before getting onto Plan B, I decided to get a nice smooth cursor. Reading the mouse every 3 or 5 frames will make the whole thing feel sluggish. perception is everything in games, and if you feel like input is responsive, you’ll ignore a lot of a games flaws. So even though the game will only check clicks and positions every 3 to 5 frames, having it move every frame makes it feel like the games moving and playing much more smoothly. Oh… and Hardware sprites are a godsend for this kind of thing, it makes it basically “free”.
I used the same trick in Blood Money on the C64. The game ran in 3 frames as well as it was a slow scrolling game, but the player sprites moved every frame, and so it all felt quite responsive.
I started by moving the mouse reading into my interrupt routine, and it all promptly fell flat on it’s face. Well… that wasn’t the plan. Turns out, I needed to “save” the current NEXT register (this was before the NextReg instruction appeared). So on entry into the IRQ, I now save the current register, restoring it on exit and suddenly everything was looking much nicer, in fact it was looking like a “proper” lemmings level, cursor and everything!
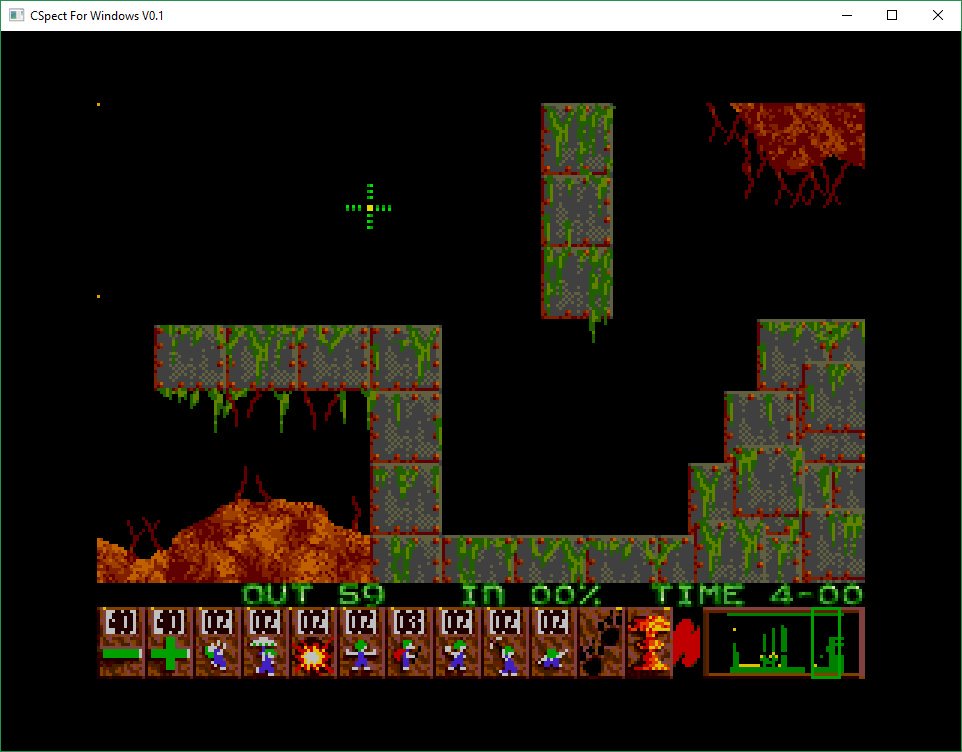
Also, now that I had managed to extract the .SPR format graphics, I was also able to extract the level brushes that are used to build the level. This was great, as it meant I could use the original level files, and not the 320K “bitmaps” I had been using.

Not having to convert the level files is a bonus to be sure. The level files are much smaller, and also well documented. They not only include the level bitmap data, but also objects and collision. So using the level format was going to be far more useful.
About this time, I also realised I’d need a debugger in my emulator…. bleh. More tools work, but again one that would pay dividends later. So yet again, I spend a few weeks writing a good debugger, one that is actually usable for development, not just hacking. This also involved loading the symbol file from SNasm so I could display labels. I’ve always had a very specific view of how assembly debuggers should work, and the “view” you should use. I’ve used stacks of truly terrible debuggers over the years, simple scrolling registers and “current” opcode ones stand high on my hate list…
The debugger has been updated over time like the rest of the tool, but it’s pretty useful now. I’ve used the same layout for almost 30 years…. I wrote my first useful debugger for the PC Engine back in ’91, and used almost exactly the same kind of layout. It was the one I used on the PDS (Personal Development System) kit I used to make C64 games in the late 80’s, and it works incredibly well.
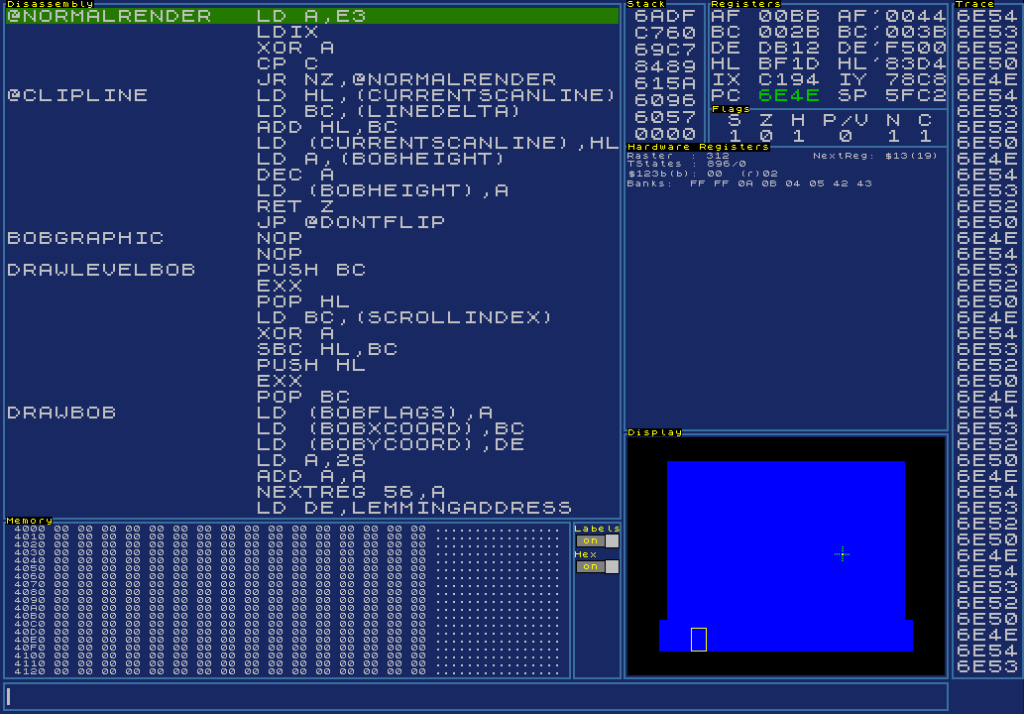
A free moving, scrolling disassembly window is vital, it just makes life MUCH simpler, and a static place for registers is just as important as your eyes will always drift to that fixed location when actually debugging. If it moves around, you’ll waste time trying to find it. a second or two each “step” adds up.
The rest of the space just depends on the machine, and what hardware it has. On the PC Engine, I displayed VRam and some hardware info, on the Next I display the screen and some hardware registers – I’ll show them all eventually.
The column of numbers on the right is my latest innovation…. a CPU execution list. This is a godsend when the machine crashes and resets. I can just flick back over this (massive!) list until it gets back into the game, and I can see where it went nuts. I’ve used this a few times already.
Anyway… back to Lemmings and Plan B! So when you have any kind of performance issue, there’s 2 ways to approach it.
- Try and optimise the hell out the slow function.
- Try a totally different method.
Now it was clear that unrolling loops, making towers of code etc. just wouldn’t work in this case. Even taking the loops away would only remove a scanline or 2 at most. What I needed was the fastest way possible to stick pixels on the screen. So….what is that exactly?
Well, if you think about how a sprite is drawn, you see you have a source address – the sprite, the destination address – the screen, and you need to copy the data from one to the other. This normally consists of loading A with a value and sticking it into the destination. So how about…. we just write a sprite as a series of load/store instructions? Kind of like this…
LD (IX+0),COLOUR1      ; 19 T-States
LD (IX+1),COLOUR1
LD (IX+2),COLOUR2
LD (IX+3),COLOUR1      ; = 76 T-States
And so on… Now… IX would have been ideal, as you could point it to the top of the graphic, and it could offset along a line, but storing via IX takes 19 T-States. That’s pretty damn slow – in fact, it’s even slower than our LDIX which is just 16. However…. LD (HL),A is only 7…. that’s a fair speed up. And Lemmings by their nature have “runs” of colour green hair, white face, blue body and so on. That means we’d only need to reload A when the colour changes. This turns the above code into this…
LD A,COLOUR1           ; 7 T-States
LD (HL),A              ; 7
INC HL                 ; 6
LD (HL),A
INC HL
LD A,COLOUR2
LD (HL),A
INC HL
LD A,COLOUR1
LD (HL),A              ; = 67 TStates
Also…. LD (HL),$XX is only 10 T-States, so if we need to change “A” for only a little, we could just store a value directly, which would save reloading A
LD A,COLOUR1          ; 7 T-States
LD (HL),A             ; 7
INC HL                ; 6
LD (HL),A             ; 7
INC HL                ; 6
LD (HL),COLOUR2       ; 10
INC HL                ; 6
LD (HL),A             ; 7 = 56 TStates
Getting there…. Now, as the Layer 2 screen is only 256 wide, we also know on a single line, we’ll never cross a 256 byte boundary. So we don’t need to increment HL, only L.
LD A,COLOUR1          ; 7 T-States
LD (HL),A             ; 7
INC L                 ; 4
LD (HL),A             ; 7
INC L                 ; 4
LD (HL),COLOUR2       ; 10
INC L                 ; 4
LD (HL),A             ; 7 = 50 TStates
Now we’re talking! Lastly, not every pixel in a (say) 6×9 sprite is plotted, so unlike a load of LDIXs which is basically 6*9*16 = 864, just for the load/store parts never mind the management and line changing, we can get by with “JUST” the pixels we need to draw. This might mean doing 2 INC Ls, or an ADD HL,$0000 (another new NEXT opcode) to skip pixels, but that’s still faster than storing. A normal Lemming is probably half, to 3 quarters actual pixels to plot, so that’s a big saving.
I decided to just sit down and manually write a Z80 function for drawing a single lemming – which while it took a bit of time, meant I could hand tune this code to make it as fast as possible.
A good tip for when doing any kind of R&D like this, is that you should always use the machine to its maximum and then work back from there. Sure, you might manage to do something using 1Mb of code or tables, and that may not work in a game situation, but at least you know it IS possible. There’s normally a middle ground where you lose a little speed, but maintain most of the benefits. I’ve done a lot of R&D code in my time that’s turned into real code, and this has always been the best approach.
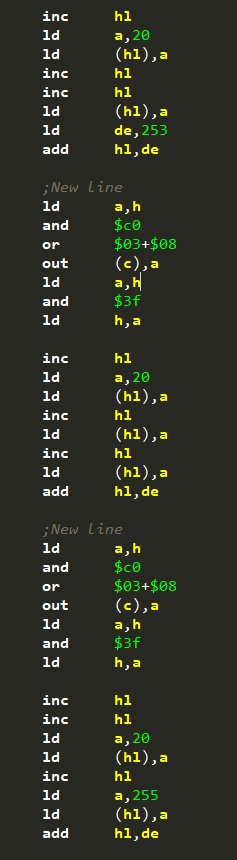
This is a snip-it of the hand build Lemming draw function. You can see I try and reduce reloading as much as possible, but you do have to do the “newline” section after each line, as you could be bank swapping. This did work out fairly well though, and I managed to reduce the Lemming drawing down to just over a scanline!
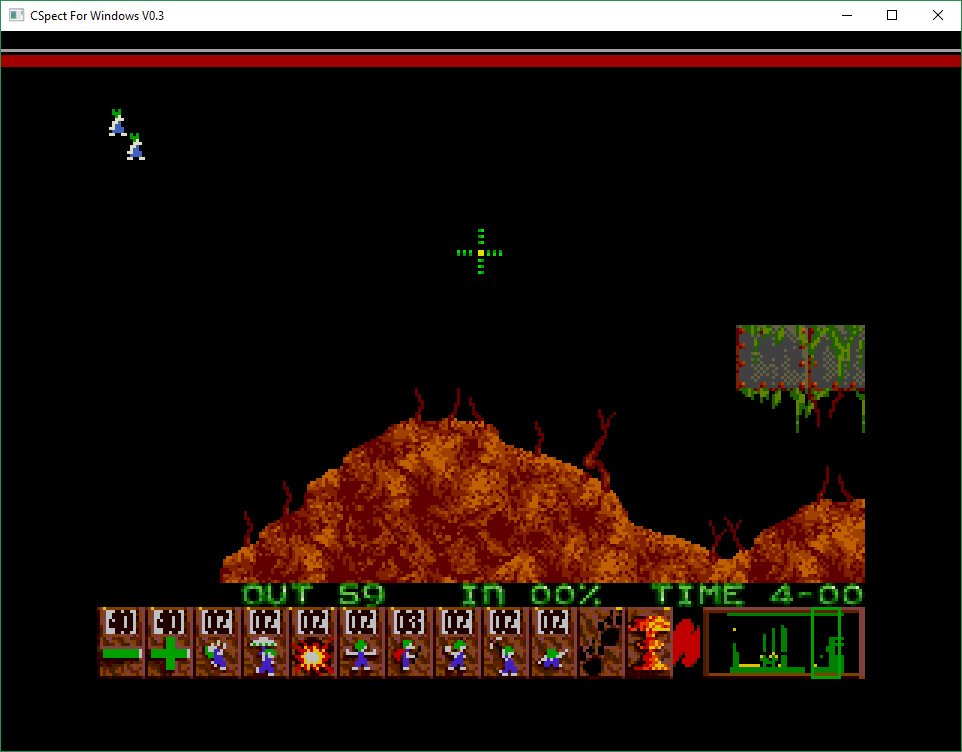
Here you can see the new Lemming speed (timing bar in white), and the old one (in red). This was definitely looking more promising. This means I could now draw a screen full in under a frame, which is certainly a requirement if I have any hope of achieving my target frame rate of 17fps. (same as the Amiga version).
Now that I saw this was possible, it was time to take the next step…. That step, is to automatically generate Z80 code based on a graphic so I didn’t have to hand build hundreds of Lemming graphics. So inside my Lemmings graphics converter, I started to scan each lemming sprite, and generate a large, optimised, Z80 function that would draw it.
As I progressed I came up with more rules and optimisations that would help. This was pretty cool, because each time I sped things up, I could just regenerate ALL my graphics and everything gets faster! How cool is than!
For example, I wasn’t using the DE register pair, so I was able to pre-load D and E with the 2 most common colours. This meant I didn’t have to continually reload them, in fact only if there was a run of 3 pixels of the same colour would I need to load A at all.
I use the special “write” only mode of Layer 2, in location $0000 to $3FFF, and this allows me to write some simple, and fast, bank swapping code.
You can see the fruits of my labour above. As you can also see in the video, the next major issue I would have, is clipping. If you draw sprites normally, you can simply reduce the loop size to draw less, but with code drawing things, you can no longer do that. But, as the sprites are less than 16 pixels wide I decided to reduce the screen size by 8 pixels on either side, meaning I no longer had to clip left/right – sweet! However…. vertical clipping is a real issue as it has the potential to run off into memory, or come back in the bottom.
Clipping the top is by far the most difficult, as the panel at the bottom gives me a way to “replace” corrupted graphics. At the moment I simply copy the panel each frame, “fixing” the overdraw, but this is only a temporary solution. Ideally I’d use a raster IRQ and flip buffers so I can free up that copy – or a simple copper list (which would be better, but we didn’t have that yet!).
The top of the screen however, is an issue…. how can you simply clip the top of the sprite. I could build a table of jumps and jump into the code at the right point, but that would slow, and a nightmare to generate. What I decided to do was to draw the sprite “backwards”. This means I could ignore the lower clipping as I planned, then as I draw upwards, detect going off the top of the screen (by looking to see the bank “loop”), and simply RET from the function. This turned out to work just fine… here’s a snippet of the auto generating code function…
{
   switch (bc)
   {
       case 0: break;
       case 1: sb.AppendLine("\t\tinc\tl"); tstates += 4; bytes += 1; buff.Write(0x2C, 1); break;
       case 2:
               sb.AppendLine("\t\tinc\tl"); tstates += 4; bytes += 1; buff.Write(0x2C, 1);
               sb.AppendLine("\t\tinc\tl"); tstates += 4; bytes += 1; buff.Write(0x2C, 1);
               break;
       case 3:
               sb.AppendLine("\t\tinc\tl"); tstates += 4; bytes += 1; buff.Write(0x2C, 1);
               sb.AppendLine("\t\tinc\tl"); tstates += 4; bytes += 1; buff.Write(0x2C, 1);
               sb.AppendLine("\t\tinc\tl"); tstates += 4; bytes += 1; buff.Write(0x2C, 1);
               break;
       default:
               // "HL" never crosses a 256 byte boundary here, so just add to L. 15 Tstates, 4 bytes (1 T-State faster than add hl,$0000)
               sb.AppendLine("\t\tld\ta," + (bc & 0xff).ToString()); tstates += 7; bytes += 2; buff.Write(0x3E | (((uint)(bc & 0xff)) << 8), 2);
               sb.AppendLine("\t\tadd\ta,l"); tstates += 4; bytes += 1; buff.Write(0x85, 1);
               sb.AppendLine("\t\tld\tl,a"); tstates += 4; bytes += 1; buff.Write(0x6f, 1);
               a = bc & 0xff;
               break;
    }
}
In this section, each time I move along the line to the next pixel, I check to see what way is fastest. For anything under 4 bytes, you just INC L = 12 T-States (max). For any more, you need to add using A and that makes 15 T-STates, one faster than the new ADD HL,$0000 instruction. Lots of these little tricks helps drive the count down and make the function faster. You’ll also notice I generate ASM source and byte code. This was so I could not only debug it, but also view a complete function and see if there was any little tricks I was missing.
So to round off this entry, here’s an example of the auto-generated code in it’s final state for drawing the sprite below….

Remember, this draws from the BOTTOM-LEFT most pixel, across to the right, then jumps back up one line and back to the start of the line again…
At 14Mhz in the border we have 224*4 = 896 T-States (while the screen area is more complicated as it drops to 7Mhz over the screen itself). As you can see from below, a typical lemming is now drawing in well under a scanline. Sure, there is surrounding management code, but this is pretty good going, and means I can draw all my lemmings in well under a frame – probably around 150-200 scan lines (taking the CPU speed drop into account).
If you happen to spot a possible speed-up, please let me know. I do know I could use JP instead of JR for my next line test, but working out the address instead of being relative would be a major pain in the butt, so I’ve left it for now. I may go back and change it later if I’m feeling adventurous.
I could also move more out of the common code section, but for the rest, feel free to point anything out. (*both these have now been done)
lastly…. remember there will only ever be one case where it could bank swap. No graphics are large enough to swap 2 banks, and usually it won’t swap at all.
EDIT: Code below has been updated.
; Sprite Number 22
  ; Common code = 59 T-States (outside function)
  ; HL = screen address [y,x]
  ld de,20479  ;Most common 2 colours

  ld a,5
  add a,l
  ld l,a
  ld (hl),e
  add hl,-258   ;move back to start of line, and up one line

  ;New line
  bit 6,h
  jp z,@NoBankChange9
  ld a,h
  and a,$3f
  ld h,a
  ex af,af'
  sub $40
  ret m
  out (c),a
  ex af,af'
@NoBankChange9:

  ld (hl),d
  inc l
  ld (hl),e
  add hl,-259   ;move back to start of line, and up one line

  ;New line
  bit 6,h
  jp z,@NoBankChange8
  ld a,h
  and a,$3f
  ld h,a
  ex af,af'
  sub $40
  ret m
  out (c),a
  ex af,af'
@NoBankChange8:

  ld (hl),e
  inc l
  ld (hl),d
  inc l
  ld (hl),d
  add hl,-259   ;move back to start of line, and up one line

  ;New line
  bit 6,h
  jp z,@NoBankChange7
  ld a,h
  and a,$3f
  ld h,a
  ex af,af'
  sub $40
  ret m
  out (c),a
  ex af,af'
@NoBankChange7:

  ld (hl),e
  inc l
  inc l
  ld (hl),d
  inc l
  ld (hl),d
  add hl,-259   ;move back to start of line, and up one line

  ;New line
  bit 6,h
  jp z,@NoBankChange6
  ld a,h
  and a,$3f
  ld h,a
  ex af,af'
  sub $40
  ret m
  out (c),a
  ex af,af'
@NoBankChange6:

  ld (hl),e
  inc l
  inc l
  ld (hl),d
  inc l
  ld (hl),d
  inc l
  inc l
  ld (hl),e
  add hl,-260   ;move back to start of line, and up one line

  ;New line
  bit 6,h
  jp z,@NoBankChange5
  ld a,h
  and a,$3f
  ld h,a
  ex af,af'
  sub $40
  ret m
  out (c),a
  ex af,af'
@NoBankChange5:

  ld (hl),e
  inc l
  ld (hl),d
  inc l
  ld (hl),d
  inc l
  ld (hl),e
  add hl,-258   ;move back to start of line, and up one line

  ;New line
  bit 6,h
  jp z,@NoBankChange4
  ld a,h
  and a,$3f
  ld h,a
  ex af,af'
  sub $40
  ret m
  out (c),a
  ex af,af'
@NoBankChange4:

  ld (hl),d
  inc l
  ld (hl),d
  add hl,-258   ;move back to start of line, and up one line

  ;New line
  bit 6,h
  jp z,@NoBankChange3
  ld a,h
  and a,$3f
  ld h,a
  ex af,af'
  sub $40
  ret m
  out (c),a
  ex af,af'
@NoBankChange3:

  ld (hl),e
  inc l
  ld (hl),e
  inc l
  ld (hl),e
  inc l
  ld (hl),20
  add hl,-258   ;move back to start of line, and up one line

  ;New line
  bit 6,h
  jp z,@NoBankChange2
  ld a,h
  and a,$3f
  ld h,a
  ex af,af'
  sub $40
  ret m
  out (c),a
  ex af,af'
@NoBankChange2:

  ld (hl),e
  inc l
  ld (hl),20
  inc l
  ld (hl),20
  add hl,-258   ;move back to start of line, and up one line

  ;New line
  bit 6,h
  jp z,@NoBankChange1
  ld a,h
  and a,$3f
  ld h,a
  ex af,af'
  sub $40
  ret m
  out (c),a
  ex af,af'
@NoBankChange1:

  ld (hl),20
  inc l
  ld (hl),20

  ld a,2
  out (c),a
  ret
  ; T-States=714/762     bytes =246