So, I thought it would be a nice little change of pace to do a little retro game hacking, and at the same time learn about binary files. Since most retro games are stored in old binary formats, buffers are ideally suited for hacking into them. For this example, we’re going to pull apart the old ZX Spectrum classic Manic Miner. We’ll use this for a couple of reasons; first there are several places that describe the format of this old game, and second Matthew Smith has already given permission previously for others to distribute and play with it. I’m going to use these docs as they look fairly detailed and appear to have everything we need: http://www.icemark.com/dataformats/manic/mmformat.htm
(this page is now only available through the internet archive, so I’ll copy it here for security at some point)
This page will certainly get us to a point where we can see a level – which is all I’m really looking to do here. So, first let’s get a small framework going so we can load the game and start hacking away at it. Create a new project and add 3 new objects; oController, oLevel and oPlatform. Then create an 8×8 sprite that is just a red square outline and attach it to the oPlatform object. Next download the Manic Miner game from below and add it to your included files….
Now, go into your room and setup a room width,height to 256,192 – the size of the ZX Spectrum screen, and a viewport of the same, but with the viewport properties of 1024,768 – as shown below.

With the framework now in place, all we need to do is add the oController object into the room and then we’re ready to actually start ripping some of the data from the file. So let’s create a script called LoadGame() and then inside a new create event in the oController object add this…
/// @description Load Manic miner game and parse it all!
LoadGame("manic.sna");
Inside the new LoadGame script we’ll need to load the game from the included files, and then start looping over the 20 levels the game has.
/// @description Load the Game and parse everything out of it
/// @param filename the binary SNA file
game = buffer_load(argument0);
Now while we should really use the buffer_load_async() function these days, that’s a little complicated for this tech blog, so we’ll leave it as a synchronous load for the moment. So for now, this is all we need to do to actually load this binary file, and just before we get down to business and start poking at it with a virtual stick, lets remind ourselves what binary is! I did a blog post some time ago on binary maths, so you could have a little read up on that first ( Binary Operations ).
A binary file is a big long list of bytes, where a byte is a number from 0 to 255, so Manic Miner (a 48k game) is a list of 49,152 numbers from 0 to 255. Now the file has a small header (27 bytes) and the game code is also mixed in here – and we’re going to skip both these and jump straight to the level data. In the actual memory of the ZX Spectrum, the level data would be stored at located at address 45056 ** (so not the offset into the SNA file). The SNA file dumps all spectrum RAM from location **16384 onwards, so all we need to do is subtract 16384 from the memory address, and then add on the SNA file head (of 27 bytes) and we’ll have the base address (or index) of the level data! Follow that? No? All this boils down to is this (add to the LoadGame script just under the buffer load).
// the SNA filke header is 27 bytes -   http://www.worldofspectrum.org/faq/reference/formats.htm
SNA_HeaderSize = 27;

// base address of all Manic miner levels. SNA files "start" at 16384
level_base_address = (45056-16384)+SNA_HeaderSize;
Not exactly complicated, even though figuring it out usually is! Once we have this we’re going to create a small array of oLevel instances to be containers for our level data. So, the code below does this, and finishes the setup we need.
levels =array_create(20);

// 20 levels in Manic Miner
for(var i=0;i<20;i++)
{
    var base_address = level_base_address+(1024*i);
    var level = instance_create_depth(0,0,0,oLevel);
    levels[i] = level;
    level.visible = false;
}
Now it gets super interesting! Following the doc on the other page, we can see that each level is 1K (or 1024 bytes), and the level map is 32×16 tiles in size. We can display this map easily buy just looping over and creating some oPlatform objects at the tile locations. Put this just after the level.visible line….
// read level map
add = base_address;
for(var yy=0;yy<16;yy++)
{
    for(var xx=0;xx<32;xx++)
    {
        var block = buffer_peek(game, add++, buffer_u8);
        if( block!=0){
            instance_create_depth(xx*8,yy*8,0,oPlatform);
        }
    }
}
break;
So here’s the main buffer function we’re going to use – buffer_peek(), what this function does is to return a u8 type (an unsigned byte of 0 to 255) from the binary buffer, at location add (which is the offset into our file). You can return different types using a byte offsets within the buffer, that makes this command (along with the buffer_read() command) incredibly powerful. A buffer is like a 1D array, a straight list of values, but you can access it as bytes, Ints, Strings, Reals – however you want. In this example, we’re pretty much just reading bytes or shorts(16 bit numbers), but if you look into the API, there’s a lot to it.
So, what does this loop actually give us? It gives us the image below. The one of the left is what we’ve extracted, and the one of the right is the level as it appears in the game….
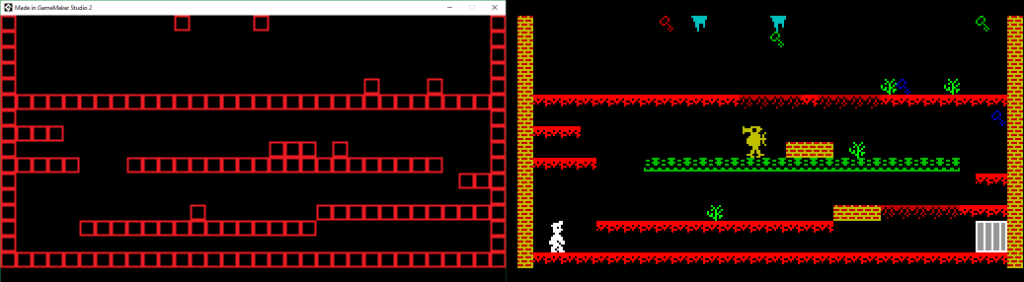
You can see all the tiles are in the right place, so we’ll now progress and get ALL the levels in this form. To do this, we’ll make a tilemap of each level, then create a function to reset and draw a new level. First, let’s store the tilemap in an array, and store it in the level instance. To do this, all we need to do is add the following line just above the tilemap loop
var tilemap = array_create(16*32);And then this line replaces the if block!=0 { } section, so that we no longer create the instances, we just remember the tiles.
tilemap[xx+(yy*32)] = block;and lastly, this line replaces the break; just after the yy loop so that we can store the array in our instance.
level.tilemap = tilemap;Easypeasy! Now we’re going to put in some control in so we can flip between levels and look at the rest of them. This involves adding some key stuff in oController, and a Change Level script. First we’ll change the create event to set a current level, then we’ll move the instance creation from the LoadGame() function into a dedicated function.
/// @description Load Manic miner game and parse it all, then select level 0
LoadGame("manic.sna");
CurrentLevel=0;
ChangeLevel(CurrentLevel);
Next we’ll add a new STEP event, and put some key detection in there.
/// @description Do level selection with Left/Right cursors

if( keyboard_check_released(vk_left) )
{
    if( CurrentLevel>0 ) CurrentLevel--;
    ChangeLevel(CurrentLevel);
}

if( keyboard_check_released(vk_right) )
{
    if( CurrentLevel<19 ) CurrentLevel++;
    ChangeLevel(CurrentLevel);
}
Now let’s add the new ChangeLevel() script. This script will erase everything from the previous level, and then create the next one.
/// @description Delete the old level, and init the new one
// destroy all current platforms
with(oPlatform) instance_destroy();
// Now create new ones based on the level we're changing to
// first get the level container
var level = levels[argument0];
// Loop over the tilemap and create blocks where it isn't empty
var tilemap = level.tilemap;
for(var yy=0;yy<16;yy++)
{
for(var xx=0;xx<32;xx++)
{
var block = tilemap[xx+(yy*32)];
if( block!=0)
{
instance_create_depth(xx*8,yy*8,0,oPlatform);
}
}
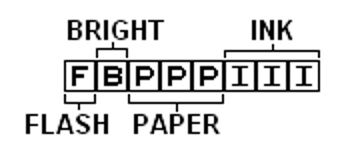
}Now, if you run this you can flip back and forth with the LEFT/RIGHT cursor keys, and the first thing you’ll notice, is that some levels are just solid. This is because (it turns out) this isn’t a block map, but an attribute map. Attributes on the ZX Spectrum were the way it did its colours, and a single byte (8 bits) had different flags and sections to it. The first 3 bits are the INK colour (that gives us 8 values, 0 to 7) and the next 3 give us the PAPER colour. The Next bit selects bright mode, this simply makes both the ink and paper a little brighter. Lastly is flash, this will swap the ink and paper colours around every now and then. This layout is shown here…
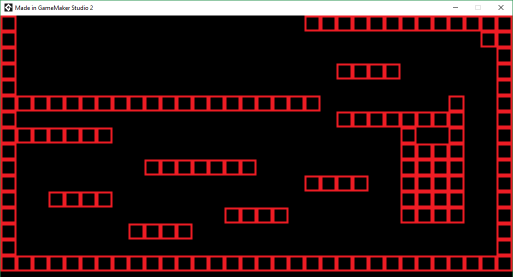
Knowing all this we can get a slighting better indication of level layout if we only look at the INK colour for our block detection. So let’s change our instance creation loop..
        var block = tilemap[xx+(yy*32)];
        if( (block&7)!=0)
        {
            instance_create_depth(xx*8,yy*8,0,oPlatform);
        }
This keeps the lower 3 bits of the tilemap block (which we now know is the INK colour), and if you run this, level 2 now looks more normal.
Next time, we’ll look to start getting graphics out the game file, and then we’ll really start seeing what the levels look like.