A few folk have asked how my parallax demo works, most assuming it’s a mix of tiles and layer 2, but this was actually written before the Tilemap was added. It’s actually just massive multiplexing of sprites.
The Next has 128, 16×16 sprites, and can display 100 per line. This is hugely powerful, especially when you multiplex them – so let’s take a look….
First, what is multiplexing? Well, before we get to that, how is a screen drawn? In the old days on a CRT, a beam drew the screen from the top left, to bottom right, with the beam moving left to right, and flying back after each scanline to the start of the next line, then at the end of the display, flying back up to the start of the screen. The image below – just a googled imaged from the Internet, shows this…
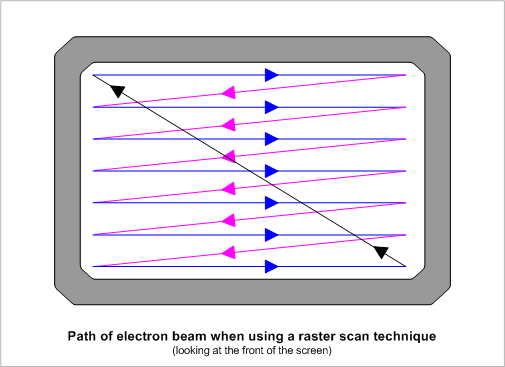
So imagine as we draw a sprite, the scanline will draw the first line, then fly back, then draw the next line, then fly back, then draw the 3rd line…and so on. Now the trick to multiplexing is once it’s finished drawing the last line of a sprite, you can reposition it below, and that raster will draw the same physical sprite again!
So if you display 100 sprites at Y pixel 0, you could – if you can reposition them quick enough, draw ANOTHER 100 on line 16! On the C64, which did this a lot, you couldn’t place them exactly on the next line, you had a few lines between as it took time to setup each sprite. The Next is much faster, so you can setup a lot more in the “horizontal” blank area – that area from the end of the screen to the start of the next line.
So lets take a look at our demo. We have 5 full visible playfields here. the 3 main “rock” playfields, the lava playfield and the cave background.. The cave and the lava are the same Layer 2 screen, with the layer priority “flipped” by the copper at the bottom half of the screen.
The rest is all made from sprites.
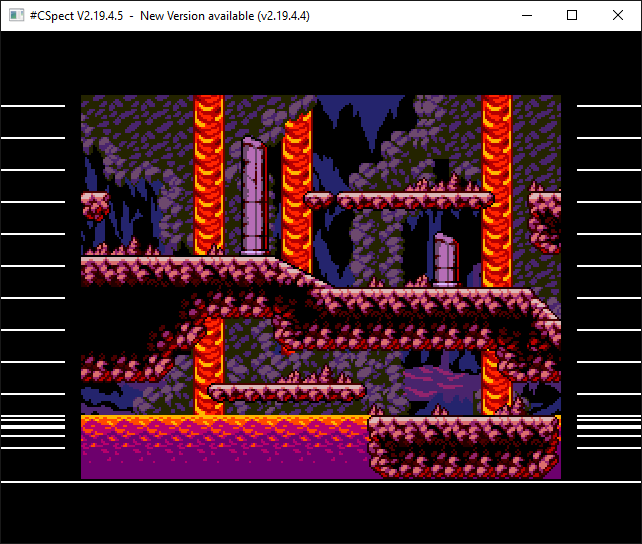
In CSpect if you press CTRL+ALT+S, you’ll see this (note this key is changing in later versions). This shows where raster interrupts, and copper waits are occurring. the top lines are IRQs where I setup the next batch of sprites, and the later ones are copper waits that setup the lava scrolling zones.
each layer uses 16 sprites, and I have 3 screens meaning I’ve to setup 48 sprites each IRQ. Now even the Next can’t setup sprites this quickly, so this would either mean a scanline gap, or I can use a different set of 48 sprites for the next line – which is exactly what I do.
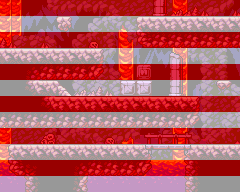
So on first red strip, I use sprites 0 to 47 for the 3 layers, and on the following white strip, I use sprites 48-95. I then multiplex sprites 0-47 for the next red strip, then multiplex sprites 48-95 on the next white strip and so on. This means I can place sprites right next to each other without any setup issues.
Now… technically… I could create a copper that does this for me, and I could “probably” setup 48 sprites in the border time. The Copper is incredibly quick, taking only a pixel or so for each value set, so there should be plenty of time to set them up – thereby saving you 48 sprites.
But for a demo, I don’t bother – and it still leaves me 32 16×16 sprites for a game if I wanted to…
So lets recap…
I generate scanline IRQs every 16 scanline/pixels, and in each IRQ I multiplex sprites 0-47, or 48-95 to display the next strip of the display. The main loop updates the copper which generates the lava flow, and the background is just a static layer 2. The animating “falling” Lava is just a lava 16×16 sprite being scrolled through a single 16×16 shape.
I do actually generate the 3 playfields from scratch every frame from a proper map for each layer, meaning it could be used for a game quite easily. The tiles are all 256 colour sprites, but for a game I’d reduce these to 16 colour to give me more baddie shapes, but again for a demo – it’s fine.
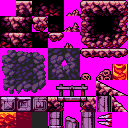
Please be aware these tiles are NOT free to use, but if you want them, they are a lovely Tileset available on Itch.io here – https://aamatniekss.itch.io/lava-caves-tileset
So there you go. As you can see, it’s actually quite a simple demo, you just need to have an understanding of how the screen is generated, and how you can play with the layers and sprites and the display is rendered.